Introduction
Pressure sensor accuracy is a crucial aspect of any pressure measurement system. It is essentially the difference between the actual pressure and the reading given by the sensor.
In many applications, from industrial processes to medical devices, the accuracy of these sensors can be a matter of safety, efficiency, and cost-effectiveness.
On the other hand, inaccurate pressure sensor readings can have significant consequences, ranging from safety risks and process inefficiencies to quality control issues, equipment damage, increased maintenance costs, energy inefficiency, and compliance problems. It is crucial to ensure accurate pressure measurements to mitigate these potential consequences.
In this post, we hope to dive into the most relating knowledge about pressure accuracy, including
- What does pressure accuracy mean,
- Commonly of accuracy and their relationship
- Accuracy and pressure types
- Accuracy and precision
- Accuracy and resolution
- Accuracy and pressure range
- Factors affect pressure accuracy
- Temperature compensation and accuracy
- Digital pressure sensor and accuracy
- MEMS technology and accuracy
- Different components and measurement accuracy
- Industry trends and potential applications
Understanding Pressure Sensor Accuracy
What is pressure sensor accuracy?
Pressure sensor accuracy is typically expressed as a percentage of the full scale (FS), which is the difference between the minimum and maximum pressure that the sensor can measure. The accuracy of a sensor can be affected by many factors, including temperature changes, mechanical stress, and aging of the sensor.
Let’s take an example of a pressure sensor with a full scale of 100 PSI (Pounds per Square Inch) and an accuracy of ±1% FS. This means that the reading from the sensor can vary by ±1 PSI from the actual pressure.
If we’re using this sensor in a system where the pressure needs to be controlled within a range of ±0.5 PSI, this sensor wouldn’t be accurate enough. In contrast, a sensor with an accuracy of ±0.25% FS (±0.25 PSI in this case) would be sufficient.
Commonly used accuracy metrics
In an ideal world, a pressure sensor would perfectly follow a straight line on a graph of input versus output, with no hysteresis and perfect repeatability. However, in reality, all sensors show some degree of non-linearity, hysteresis, and repeatability errors, contributing to the total inaccuracy of the sensor.
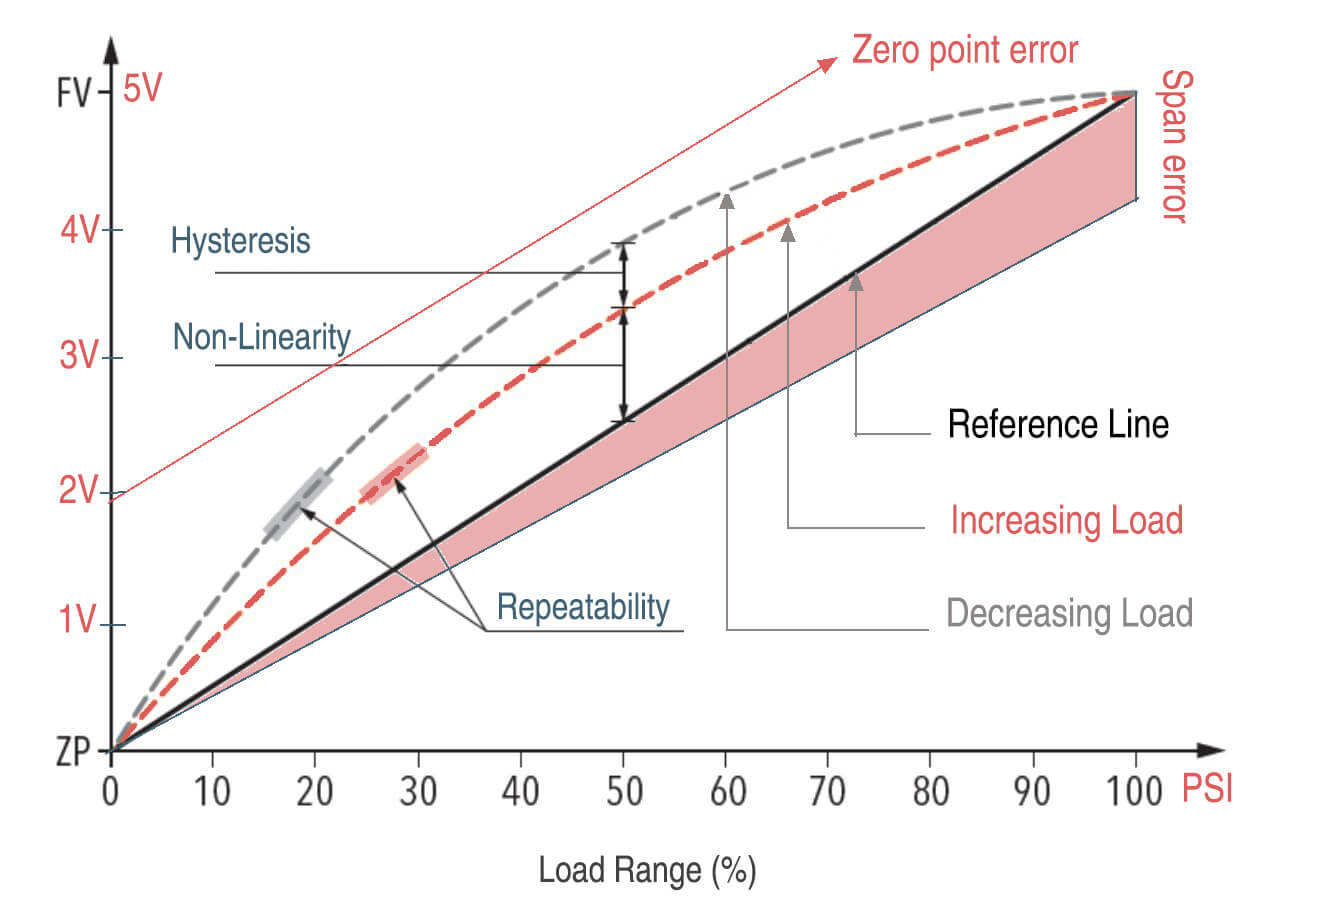
Accuracy metrics for pressure sensors are used to quantify how well a sensor can read pressure within a specific range. Here are some commonly used accuracy metrics:
Full Scale (FS) Error: This is the most common metric used to define a pressure sensor’s accuracy. It is expressed as a percentage of the full scale, which is the difference between the minimum and maximum pressure that the sensor can measure. For example, a sensor with an accuracy of ±1% FS can vary by ±1% of the full scale range from the actual pressure.
Non-linearity: This refers to the maximum deviation of the sensor’s output from a straight-line function of the input pressure. It’s usually represented as a percentage of the full-scale output.
Linearity is a part of accuracy. It refers to the pressure sensor’s ability to produce an output that is directly proportional to the input pressure. Non-linearity contributes to inaccuracy in a sensor’s performance.
Hysteresis: This metric refers to the difference in output at any point within the sensor’s range when the value is approached from two different directions (increasing pressure and decreasing pressure). It is typically given as a percentage of Full Scale.
Hysteresis is another contributor to inaccuracy. It refers to the difference in a sensor’s output when a specific pressure point is approached from two different directions (increasing pressure and decreasing pressure). A sensor with high hysteresis can have lower accuracy.
Repeatability: This is the ability of a sensor to provide the same output when the same input pressure is applied under the same conditions, multiple times. Repeatability is usually expressed as a percentage of Full Scale.
Repeatability also contributes to accuracy. It refers to a sensor’s ability to consistently produce the same output when the same pressure is applied under identical conditions. Poor repeatability can lead to inconsistent readings, thus reducing overall accuracy.
Resolution: This is the smallest change in input pressure that the sensor can detect. It’s often tied to the sensor’s digital output and can be limited by noise.
Long-term Stability: This is the ability of a sensor to maintain its performance over a long period of time. It’s usually given as a change in Full Scale per year.
These metrics are often combined together to define the “Total Error Band“ which describes the maximum error you can expect from the sensor under normal operating conditions.
Accuracy is a broad term that can encompass linearity, hysteresis, and repeatability. It is a measure of the total error in a sensor’s reading when compared to a known standard or reference.
Accuracy and Pressure types
How pressure accuracy differs among types of pressure measurement
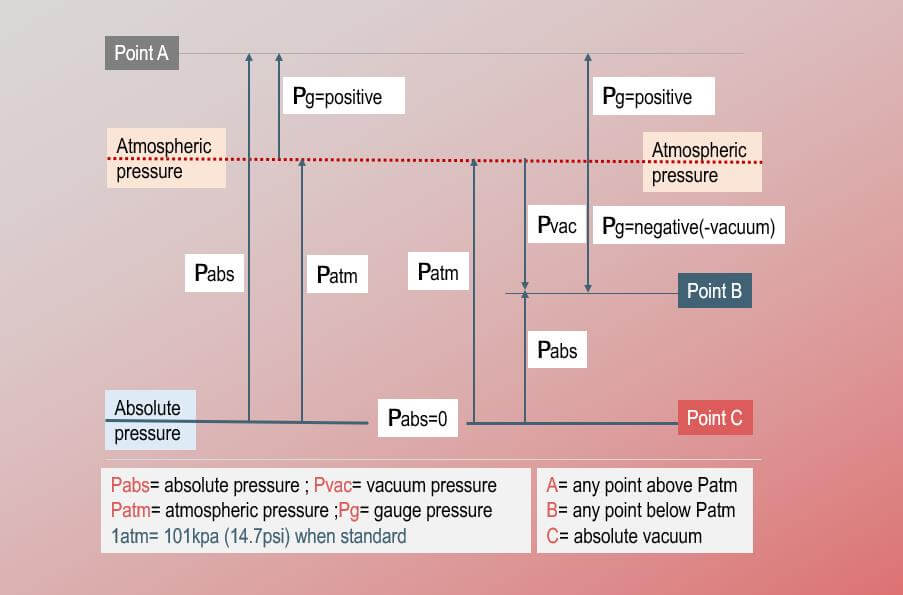
Different types of pressure measurements have varying accuracy requirements based on their specific applications. Here, we will discuss three common types of pressure measurements – absolute, gauge, and differential pressure – and how accuracy can vary among them.
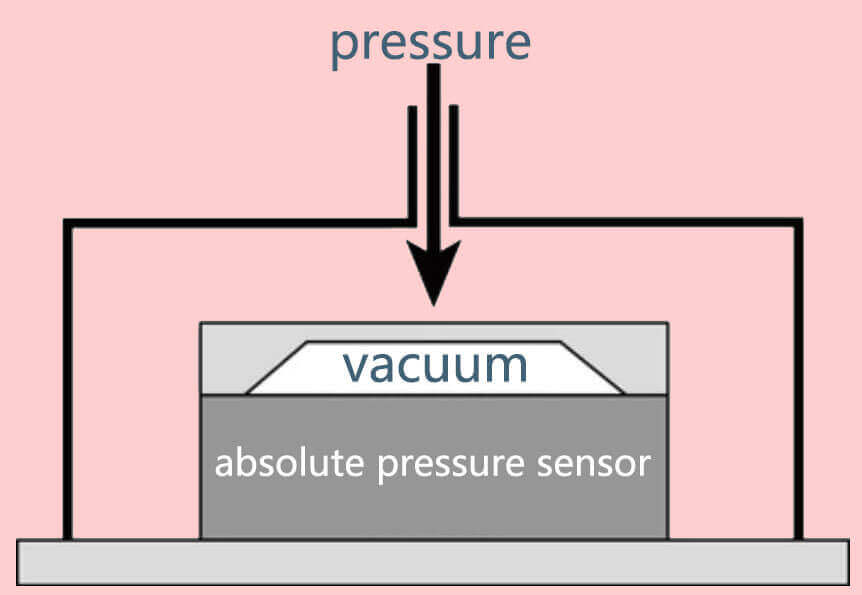
1. Absolute Pressure Measurement
This type of measurement is referenced against a perfect vacuum. It measures the total pressure exerted by the fluid, including atmospheric pressure. Because of the added complexity of accounting for atmospheric pressure, absolute pressure sensors may have slightly lower accuracy than gauge or differential pressure sensors. However, they are critical in applications like barometric pressure measurement or vacuum systems, where reference to a perfect vacuum is needed.
For example, a high-quality absolute pressure sensor might have an accuracy of ±0.1% Full Scale (FS). This means for a 1000 psi sensor; the error could be as much as ±1 psi.
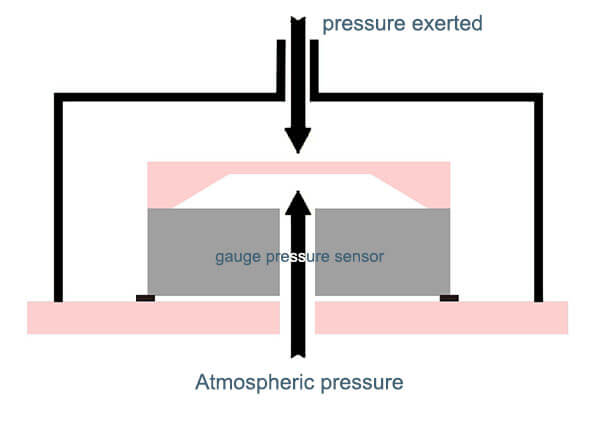
Gauge pressure measurement is referenced against atmospheric pressure and measures the pressure of a fluid above atmospheric pressure. In other words, it’s the difference between the absolute pressure and the current atmospheric pressure. Gauge pressure sensors can be designed to be very accurate within their intended measurement range. They are commonly used in applications such as tire pressure measurement, blood pressure monitors, and industrial process control.
A typical industrial-grade gauge pressure sensor might offer an accuracy of ±0.25% FS. For a gauge pressure sensor with a range of 0 to 100 psi, the error could be as much as ±0.25 psi.
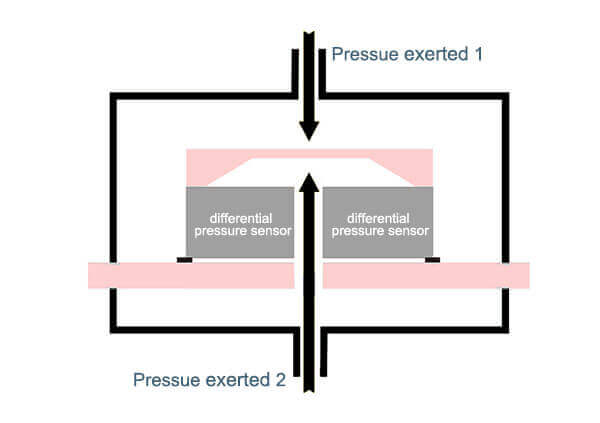
3. Differential Pressure Measurement
This type of measurement refers to the difference in pressure between two points in a system. Differential pressure sensors can be highly accurate but their accuracy can be affected by factors such as temperature variations between the two measurement points. They are often used in flow measurement, level measurement (in tanks), or filter monitoring.
An example of a differential pressure sensor could have an accuracy of ±0.5% FS. If the sensor is designed to measure a differential pressure of 0 to 50 psi, the error could be as much as ±0.25 psi.
In essence, the accuracy requirements for a pressure sensor depend largely on the type of pressure being measured and the specific application.
For instance, a tire pressure gauge may only require a 2% FS accuracy, whereas a sensor used in a critical process control application may require accuracy closer to 0.1% FS.
Selecting the right pressure sensor accuracy
Selecting the right pressure sensor accuracy involves understanding your application’s requirements and how different types of inaccuracies can affect your measurements.
1. Application Requirements
The required accuracy will largely depend on the specific use case.
For instance:
- In a laboratory environment, where precise measurements are crucial, you might need a highly accurate sensor, perhaps with an accuracy of ±0.01% FS (Full Scale).
- In an industrial setting for general process control, a sensor with an accuracy of ±0.5% FS might suffice.
- For a consumer application like a home weather station, an accuracy of ±1% FS might be more than adequate.
2. Understanding Sensor Accuracy
A sensor’s accuracy is typically presented as a percentage of the full-scale output, which refers to the maximum pressure that the sensor can measure. This percentage includes the combined effects of non-linearity, hysteresis, and non-repeatability.
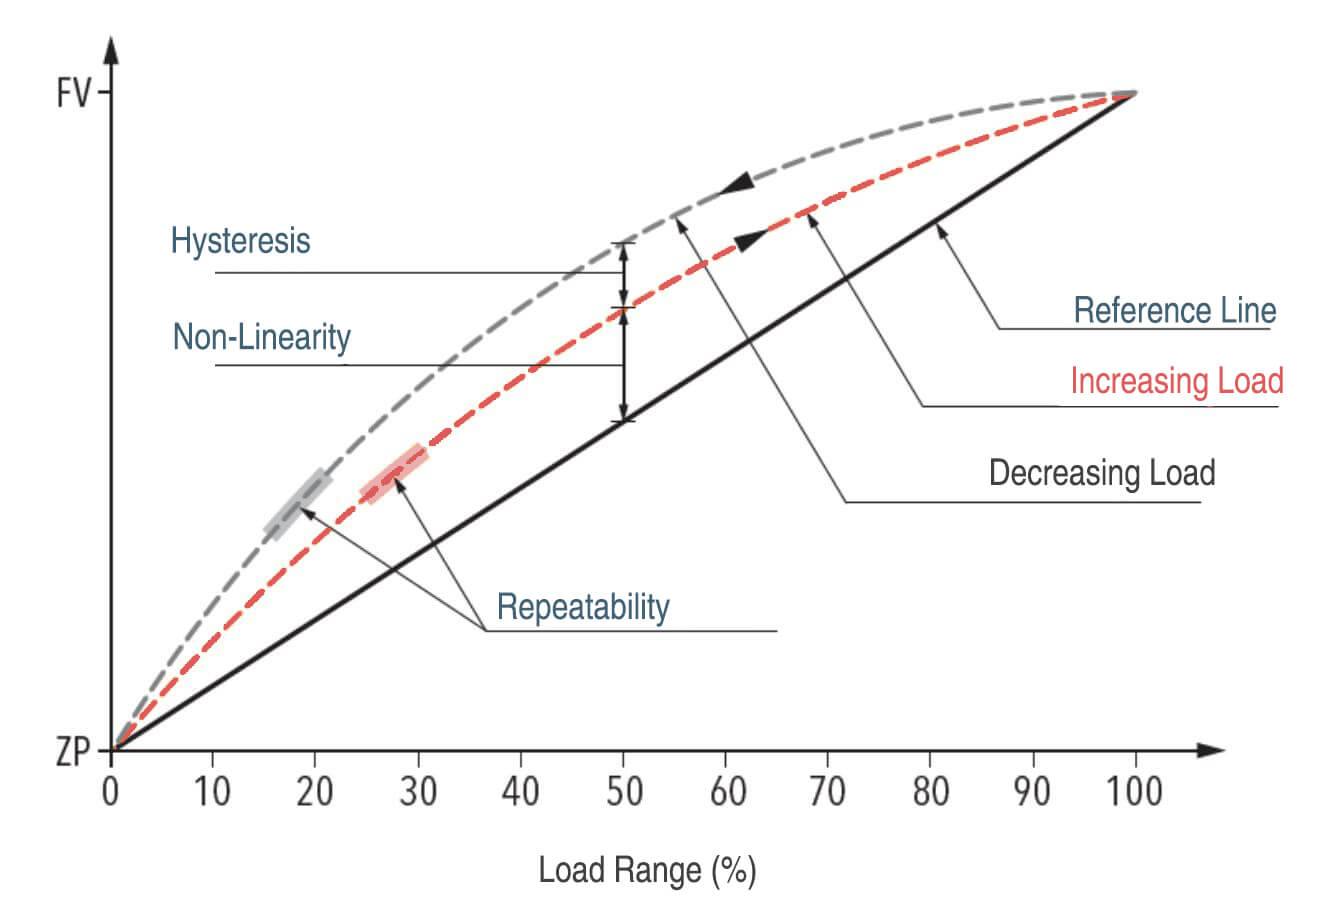
- Non-linearity is the maximum deviation of the calibration curve from a specified straight line during increasing pressure.
- Hysteresis is the maximum difference at any pressure point during increasing and decreasing pressure.
- Non-repeatability is the maximum difference in output at any pressure point for repeated measurements under the same conditions
3. Impact of Temperature Effect
Temperature can significantly impact the accuracy of a pressure sensor. For applications involving large temperature swings, consider a sensor with temperature compensation to maintain accuracy over the entire temperature range.
4. Long-Term Stability
The long-term stability of a sensor refers to its ability to maintain its performance over time. Even though a sensor might be highly accurate at the time of installation, its performance can degrade over time.
5. Calibration
Regular calibration can help to maintain the accuracy of a pressure sensor. Some applications may require frequent calibration, while others may not.
6. Cost Considerations
Higher accuracy sensors typically come with a higher cost. Determine what level of accuracy is necessary for your application and balance that against your budget.
Accuracy and Precision
Accuracy and precision are two important concepts in the field of measurement and data analysis. They’re often used interchangeably in casual conversation, but in technical contexts, they have distinct meanings.
Accuracy is about correctness; accuracy refers to how close a measured value is to the true or actual value. If you’re measuring a known standard with an instrument and your measurements are close to this known value, your measurement is said to be accurate.
For example, if you have a pressure sensor that you’re using to measure a system with a known pressure of 100 psi (the true value), and your sensor reads 100 psi, then your sensor is accurate.
On the other hand, precision is about consistency or repeatability.
Precision refers to how close the measurements are to each other, regardless of whether they are near the actual true value.
Continuing the previous example, if you use your sensor to measure the 100 psi system multiple times and get readings of 105 psi each time, your sensor is precise but not accurate. The sensor consistently gives you the same value (105 psi), but it’s not the correct pressure (100 psi).
Ideally, in most applications, you want your measurements to be both accurate (close to the true value) and precise (consistently repeatable).
Here’s a simple way to visualize these concepts:
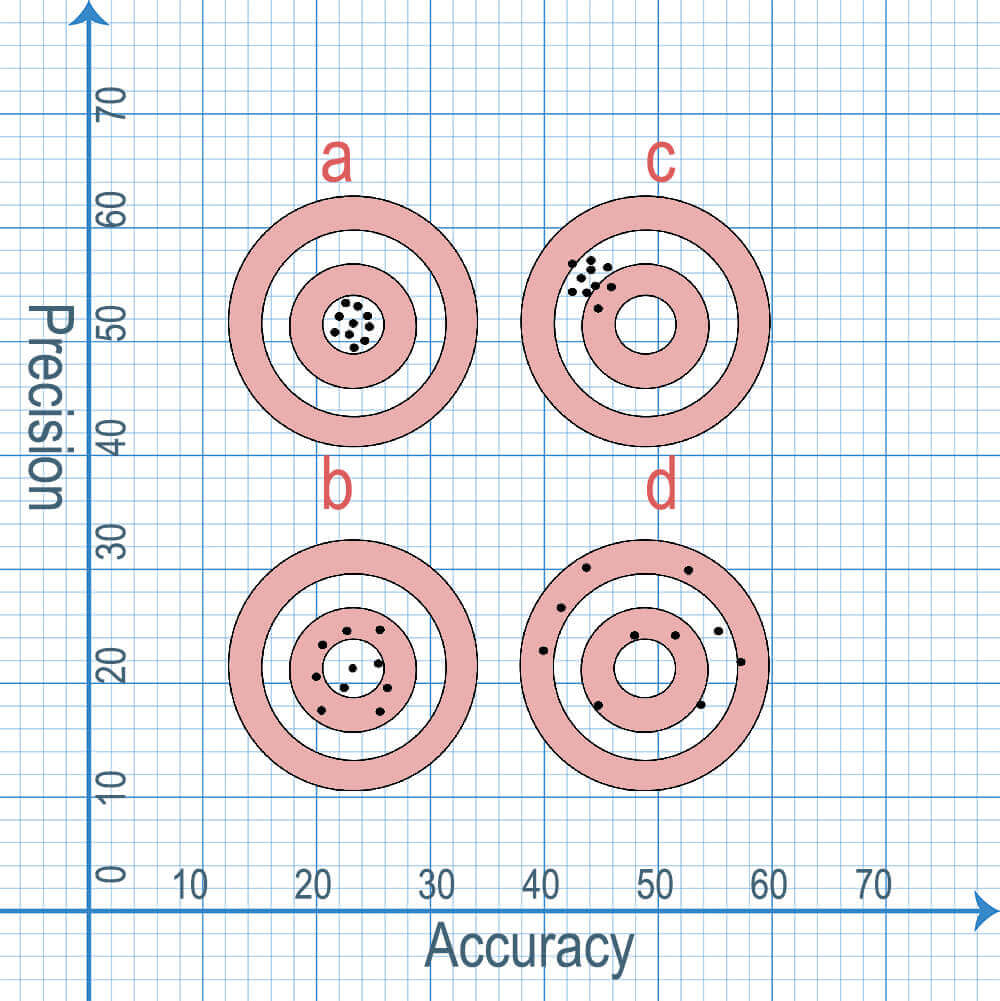
- If you were aiming at a target with arrows, accuracy would be hitting close to the bullseye (a), while precision would be hitting the same spot consistently, even if that spot isn’t the bullseye (c).
- A measurement system can be accurate but not precise(b), precise but not accurate, neither, or both(d).
Accuracy and Resolution
Pressure sensor accuracy and resolution are two important parameters that describe the performance of a pressure sensor. While they are related, they represent different aspects of the sensor’s capabilities.
Accuracy refers to how closely the sensor’s output matches the true value of the pressure being measured. It is usually expressed as a percentage of the full-scale reading. For example, if a pressure sensor has an accuracy of ±1% FS, it means that the sensor’s output can deviate by up to 1% of the full-scale reading.
Resolution, on the other hand, refers to the smallest change in pressure that the sensor can detect and distinguish. It is typically given in terms of the least significant bit (LSB) or the smallest increment that can be detected by the sensor. For example, if a pressure sensor has a resolution of 0.01 PSI, it means that the sensor can detect pressure changes as small as 0.01 PSI.
To understand the difference between accuracy and resolution, let’s consider an example. Suppose we have a pressure sensor with a range of 0-100 PSI and an accuracy of ±1% FS.
This means that if we apply a pressure of 50 PSI, the sensor’s output can deviate by up to ±1% of the full-scale reading, which is ±1 PSI. So, the sensor’s output could range from 49 PSI to 51 PSI, even though the true pressure is 50 PSI. This represents the accuracy of the sensor.
Now, let’s consider the resolution of the same sensor.
If the sensor has a resolution of 0.01 PSI, it means that it can detect pressure changes as small as 0.01 PSI. So, if we apply a pressure of 50.005 PSI, the sensor will be able to detect this change and provide a corresponding output.
However, if we apply a pressure of 50.003 PSI, the sensor will not be able to distinguish this small change and will still provide the same output as for 50 PSI. This illustrates the resolution of the sensor.
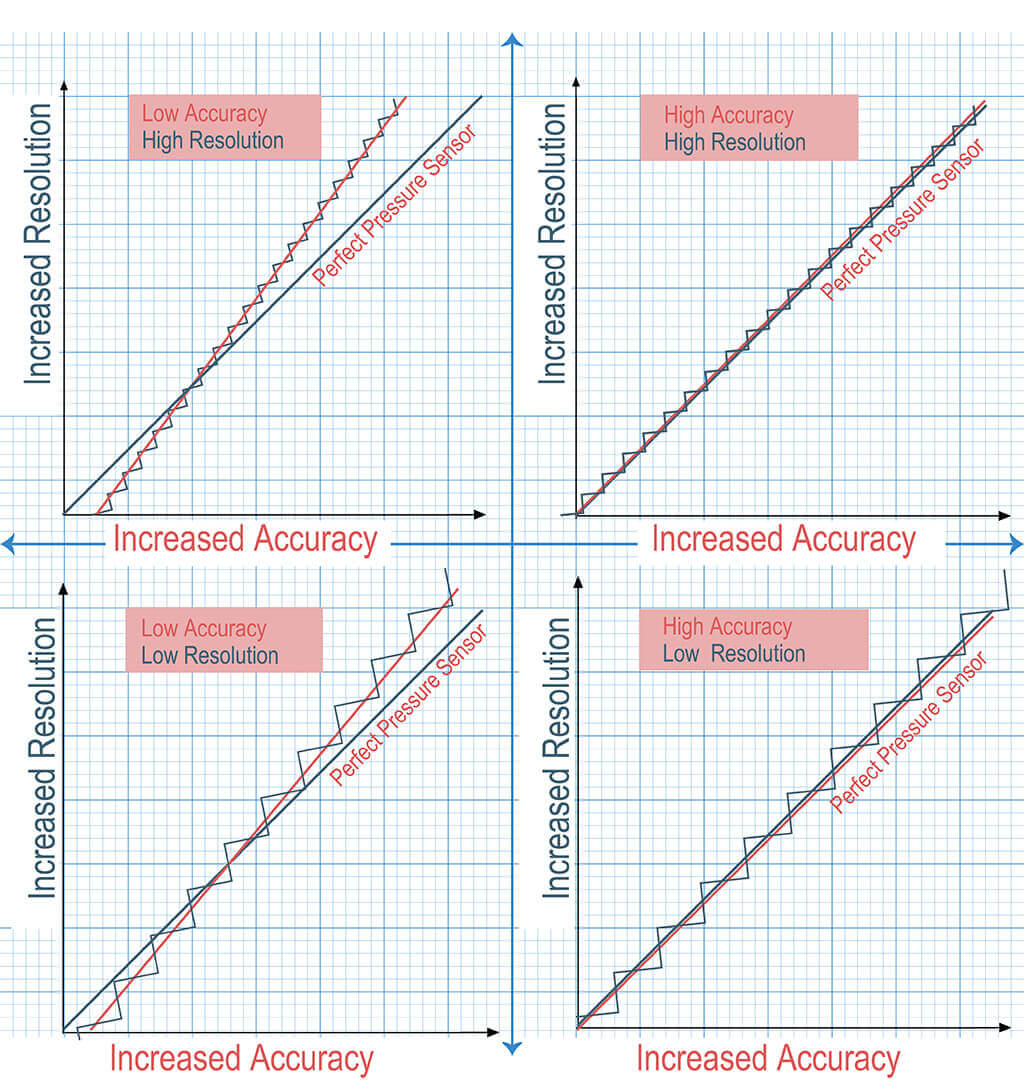
So, accuracy relates to how close the sensor’s output is to the true value, while resolution relates to the smallest change in pressure that the sensor can detect.
Accuracy is expressed as a percentage of the full-scale reading, while resolution is given in terms of the smallest increment that the sensor can distinguish. Both accuracy and resolution are important factors to consider when selecting a pressure sensor for a specific application.
Accuracy and Pressure Range
The relationship between a pressure sensor’s range and its accuracy is an important factor to consider in the design and selection of such devices.
Click to check details about Accuracy and Range
As mentioned above, the accuracy of a pressure sensor is typically specified as a percentage of the full-scale range of the sensor.
As the pressure sensor operates closer to its maximum or minimum range, the accuracy may decrease. This is because the sensor may be more susceptible to errors or noise at the extreme ends of its range.
For example, a pressure sensor with a range of 0-100 psi and an accuracy of 1% may have an accuracy of +/-2 psi at the upper end of its range (e.g. 90-100 psi) due to increased noise or sensitivity issues.
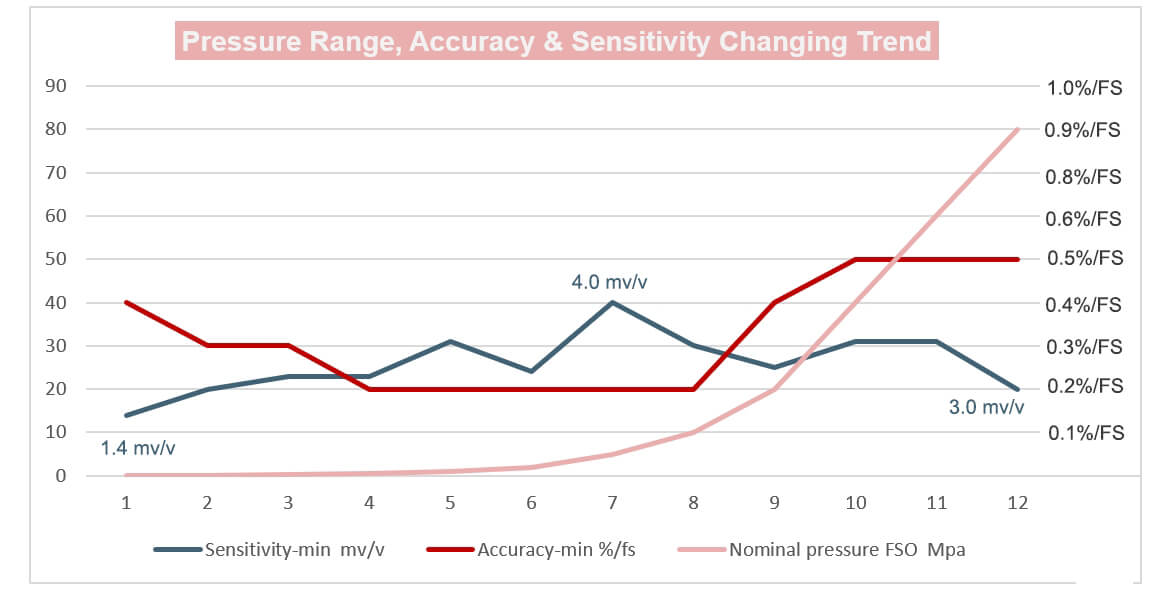
Therefore, it is important to select a pressure sensor with a range appropriate for the intended application to ensure the best possible accuracy. It is also important to consider the environmental factors that may affect the accuracy of the sensor, such as temperature, humidity, and vibration,
Let’s dive into the details in the following.
Factors Affecting Pressure Sensor Accuracy
Temperature and pressure fluctuations
Temperature and pressure fluctuations can significantly affect the accuracy of a pressure sensor.
Thermal Hysteresis: This is the change in output at a specific pressure due to changes in ambient temperature. If the temperature fluctuates, the sensor’s output may change even if the pressure remains constant, which can lead to inaccurate readings.
Temperature Compensation: Many sensors include temperature compensation mechanisms to minimize the impact of temperature changes on the sensor output. However, these compensations are not perfect and don’t completely eliminate temperature effects, especially for extreme temperature changes.
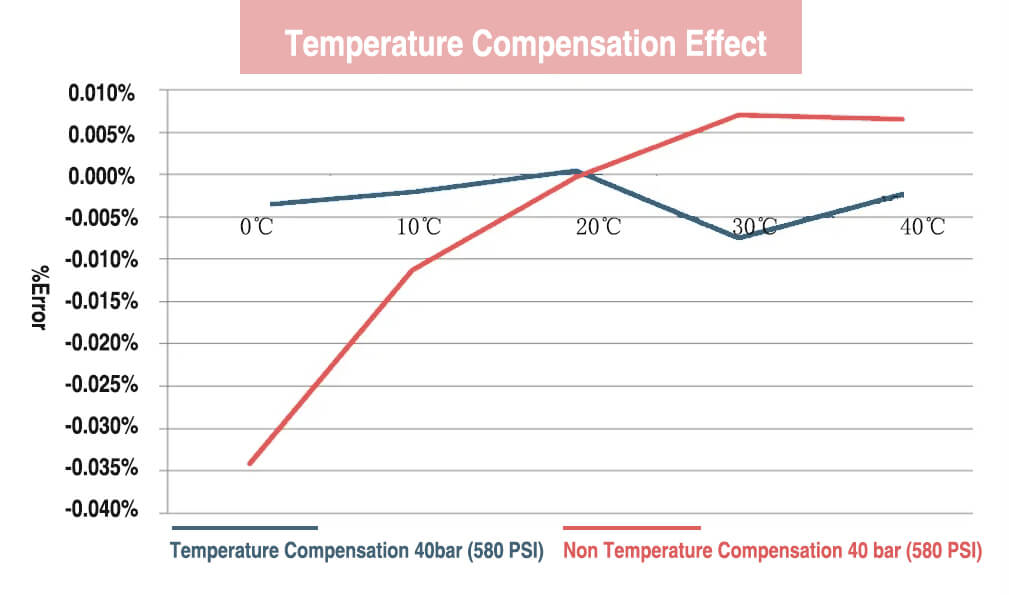
Zero and Span Shifts: Changes in temperature can cause shifts in the zero point (the output signal at zero pressure) and the span (the sensor’s full-scale output range). This can result in reduced accuracy in the pressure measurements.
2. Pressure Fluctuations
Pressure Cycling: Rapid or frequent changes in pressure can cause the sensor’s output to drift over time, which reduces accuracy. This is due to the mechanical stress on the sensor elements caused by the pressure changes.
Overpressure and Burst Pressure: Every sensor has an overpressure limit (the maximum pressure it can withstand without affecting performance) and a burst pressure limit (the pressure at which the sensor may physically fail or leak). Exceeding these limits, even momentarily, can drastically affect the sensor’s accuracy.
Proof Pressure: This is the maximum pressure that may be applied to the sensor without changing its performance within specified limits. Exceeding the proof pressure can lead to permanent changes in the sensor’s performance and reduce its accuracy.
Vibration and shock
Vibration and shock can significantly impact the performance and accuracy of a pressure sensor. These effects can manifest in a variety of ways:
1. Vibration Effects
Vibration-Induced Output: High-frequency vibrations can cause a pressure sensor to produce an output even when the pressure isn’t changing, leading to inaccurate readings. This is particularly problematic for resonant sensors, which can amplify certain frequencies of vibration.
Mechanical Damage: Prolonged exposure to high levels of vibration can cause wear and tear on the sensor components, leading to mechanical failure over time. This can result in a gradual degradation of the sensor’s performance and accuracy.
Resonance Frequency: Every mechanical system has a resonance frequency, at which it naturally wants to vibrate. If the sensor is exposed to vibrations at its resonance frequency, the resulting amplification can severely impact the sensor’s performance and potentially cause physical damage.
2. Shock Effects
Immediate Damage: A sudden, intense shock can cause immediate physical damage to a sensor, leading to an immediate loss of accuracy or total failure.
Long-term Degradation: Even if a shock doesn’t cause immediate failure, it can still damage the sensor in ways that lead to a gradual degradation of performance and accuracy over time.
Zero Shift: Shocks can cause a shift in the sensor’s zero point (the output signal at zero pressure), leading to inaccurate readings even if the sensor isn’t otherwise damaged.
Long-term stability and drift
Long-term stability and drift are crucial aspects to consider when evaluating the performance of a pressure sensor over time. They can significantly impact the accuracy of the sensor in the following ways:
1. Long-Term Stability
Long-term stability refers to the sensor’s ability to maintain its performance characteristics over a long period. A sensor with good long-term stability will provide consistent, reliable measurements with minimal fluctuations in accuracy over its lifetime.
Factors affecting long-term stability can include environmental conditions (temperature, humidity), mechanical stress, and aging of the sensor’s materials. A drop in long-term stability can lead to a gradual decrease in accuracy, necessitating more frequent calibration or replacement of the sensor.
2. Drift
Drift refers to the gradual change in a sensor’s output over time when the input (pressure) remains constant. This is a common phenomenon in many types of sensors and can lead to increasingly inaccurate measurements if not corrected.
Drift can be caused by various factors, including:
- Zero Drift: This is a change in the sensor’s output when no pressure is applied. It can result from changes in environmental conditions, mechanical stress, or aging of the sensor’s components.
- Span Drift: This is a change in the sensor’s full-scale output range. It can result from similar factors as zero drift, but affects the sensor’s entire output range rather than just the zero point.

Regular calibration is a key method to mitigate the effects of drift and maintain the accuracy of a pressure sensor. Some modern sensors also include self-calibration features or drift compensation algorithms to maintain their accuracy over time.
Mounting and installation considerations
The way a pressure sensor is mounted and installed can greatly affect its accuracy. Here are some key considerations:
1. Orientation
Pressure sensors are often calibrated in a specific orientation, typically with the sensing element oriented vertically. If the sensor is installed in a different orientation (horizontally, upside-down, etc.), this can cause a shift in the zero point and reduce the accuracy of the sensor.
2. Mounting Stress
If a pressure sensor is over-tightened or mounted unevenly, this can put mechanical stress on the sensor’s housing and sensing element. This additional stress can cause the sensor to deform slightly, which can change the sensor’s output and reduce its accuracy.
If a pressure sensor is mounted near a heat source or in a location with significant temperature fluctuations, this can affect the sensor’s accuracy. This is because changes in temperature can cause the sensor’s components to expand or contract, which can alter the sensor’s output.
As mentioned in a previous response, vibration and shock can severely affect a sensor’s accuracy. If a sensor is mounted in a location with high levels of vibration or potential for shock (such as near heavy machinery), this can lead to inaccurate readings and potential damage to the sensor.
5. Pressure Reference
Many pressure sensors are designed to measure pressure relative to atmospheric pressure (gauge pressure) or absolute vacuum (absolute pressure). The sensor’s vent to the reference pressure must be maintained. For gauge sensors, if the vent to atmosphere is blocked or subjected to a different pressure, accuracy will be affected.
Temperature Compensation: A Key to Accurate Measurements
The effects of temperature on pressure sensor readings
Changes in temperature cause materials to expand or contract. As a pressure sensor is made up of various materials (metals, semiconductors, etc.), these changes can alter the physical characteristics of the sensor and, thus, the sensor’s output.
Temperature fluctuations can cause drift in the sensor output, even when the pressure remains constant. This is because the electrical properties of the components inside the sensor (like resistors, capacitors, etc.) change with temperature, which can affect the sensor’s readings.
Changes in temperature can also lead to shifts in the zero point (the output at zero pressure) and the full-scale output range (the sensor’s span). These shifts can reduce the accuracy of the pressure measurements.
To mitigate these effects, many modern pressure sensors include temperature compensation mechanisms. These mechanisms correct for temperature-induced changes in the sensor output, thus improving the accuracy of the pressure measurements over a specified temperature range.
However,
It’s important to note that these compensation mechanisms aren’t perfect and don’t entirely eliminate the effects of temperature.
They also typically work over a specified temperature range, and outside of this range, the sensor’s accuracy may decrease.
Methods of temperature compensation
Temperature compensation in pressure sensors is critical to maintaining accurate readings across varying temperature conditions. Several methods are commonly used for this purpose:
- Analog Compensation
- Digital Compensation
- On-Chip Temperature Sensors
- Material Compensation
- Calibration at Different Temperatures
Click to check details about Temperature Compensation
Digital Pressure Sensors: Offering Enhanced Accuracy
How digital processing improve measurement accuracy
Digital processing can be used to apply calibration and compensation data to the sensor’s output.
For example, digital processing can be used to apply temperature compensation, correcting for changes in the sensor’s output due to temperature fluctuations. This can improve the accuracy of the sensor’s readings across a wide range of conditions.
What’s more, many sensors have a non-linear response, meaning the relationship between the sensor’s input and output is not a straight line. Digital processing can be used to linearize the sensor’s output, making it easier to interpret and improving the accuracy of the measurements.
Digital processing can be used to reduce noise in the sensor’s output. Techniques like digital filtering can remove unwanted noise signals, which can improve the accuracy of the sensor’s readings.
In some cases, data from multiple sensors can be combined to improve accuracy. For example, in a pressure sensing system, data from a pressure sensor and a temperature sensor could be combined to provide more accurate pressure readings. This is often done using algorithms like Kalman filters.
Digital processing can be used to detect and correct faults in the sensor’s output and can be used to average multiple sensor readings or to oversample the sensor’s output, both of which can improve the accuracy of the measurements.
Example application in real world
1. Automotive Systems
In modern vehicles, numerous sensors are used to monitor things like speed, engine performance, and environmental conditions. Digital signal processors are used to filter out noise and compensate for environmental variations, improving the accuracy of these measurements.
For instance,
Digitally processed signals from wheel speed sensors are used in anti-lock braking systems (ABS) to prevent wheel lock-up during braking, thereby enhancing vehicle safety.
Weather stations employ a variety of sensors to measure atmospheric conditions such as temperature, pressure, humidity, and wind speed. By digitally processing this data (e.g., applying compensation for sensor drift and reducing noise), more accurate and reliable weather forecasts can be provided.
In medical devices like heart rate monitors and blood pressure monitors, digital processing plays a significant role in enhancing measurement accuracy. For example, noise filtering techniques are used to remove unwanted signals caused by muscle movements or electrical interference, allowing the devices to provide more accurate readings.
By using digital processing techniques, it’s possible to significantly improve the accuracy of a sensor’s measurements, making the sensor more reliable and useful for a wider range of applications.
The Role of MEMS Technology in Pressure Sensor Accuracy
MEMS technology plays a critical role in improving pressure sensor accuracy through high precision manufacturing, integration of sensing and processing elements, size and weight advantages, improved stability, high sensitivity, and low power consumption.
it has revolutionized the field of pressure sensors by miniaturizing the sensor components and integrating them onto a single chip. This has several implications for pressure sensor accuracy:
- High Precision Manufacturing
- Integration of Sensing and Processing Elements
- Size and Weight
- Improved Stability
- High Sensitivity
- Low Power Consumption
How different components impact measurement accuracy
Measurement accuracy in a system is influenced by several components and their respective characteristics. Here are a few key components and how they can impact accuracy:
1. Sensors
The sensor is the component that interfaces with the physical world and converts a physical quantity (like temperature, pressure, or light) into an electrical signal. The accuracy of a sensor is a measure of how close its output is to the true value of the measured quantity. Factors that can affect sensor accuracy include sensitivity, linearity, hysteresis, and noise.
2. Analog-to-Digital Converters (ADCs)
ADCs convert the analog output of a sensor into a digital signal that can be processed by a computer. The accuracy of an ADC is largely determined by its resolution (the number of distinct values it can represent) and its quantization error (the difference between the actual analog value and the nearest digital value).
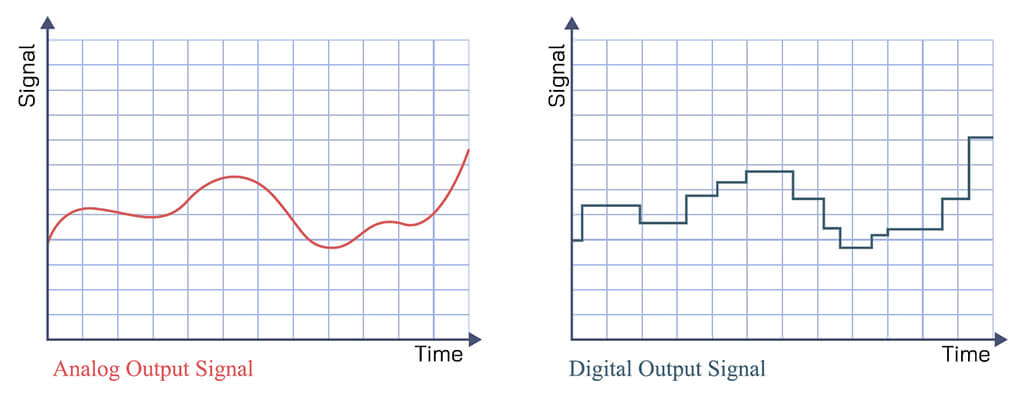
3. Digital Signal Processors (DSPs) / Microcontrollers
DSPs or microcontrollers process the digital signal from the ADC to extract useful information. The accuracy of this processing can be influenced by factors such as the precision of the arithmetic operations, the accuracy of any calibration data used, and the algorithms used for processing.
4. Software
The software that controls the system and processes the data can also impact accuracy. Bugs in the software, numerical errors, and inaccurate algorithms can all lead to inaccurate measurements.
5. Environmental Conditions
The environment in which the system operates can have a significant impact on measurement accuracy. For example, temperature changes can cause drift in sensor readings, and electromagnetic interference can introduce noise into the system.
6. Power Supply
The quality of the power supply can also affect measurement accuracy. Noise or instability in the power supply can lead to noise or instability in the sensor readings.
In order to maximize the accuracy of a measurement system, all of these components need to be carefully selected and designed to minimize errors. It’s also important to regularly calibrate the system and check for any sources of error that could reduce accuracy.
Conclusion
In conclusion, the accuracy of pressure sensors plays a pivotal role in the success and efficiency of a broad spectrum of applications, spanning from industrial process control to healthcare, automotive systems, consumer electronics, and beyond.
The drive towards digitalization and automation across numerous sectors underscores the growing need for accurate, reliable, and robust pressure sensors. These sensors form the backbone of key decision-making processes, safety systems, and user experiences.
With advancements in technology, specifically Micro-Electro-Mechanical Systems (MEMS), we are witnessing a significant improvement in the precision, durability, and versatility of pressure sensors. Algorithms such as Kalman filtering, Least Squares Estimation, sensor fusion techniques, and machine learning further enhance the accuracy of these sensors, enabling them to operate effectively even in challenging environments.
The implementation of high-accuracy pressure sensors leads to improved product quality, increased safety, enhanced user experiences, and ultimately, commercial success.
As technology continues to evolve, it is crucial for industries to prioritize the accuracy of their pressure sensing systems to remain competitive, innovative, and responsive to the needs of their respective fields.


