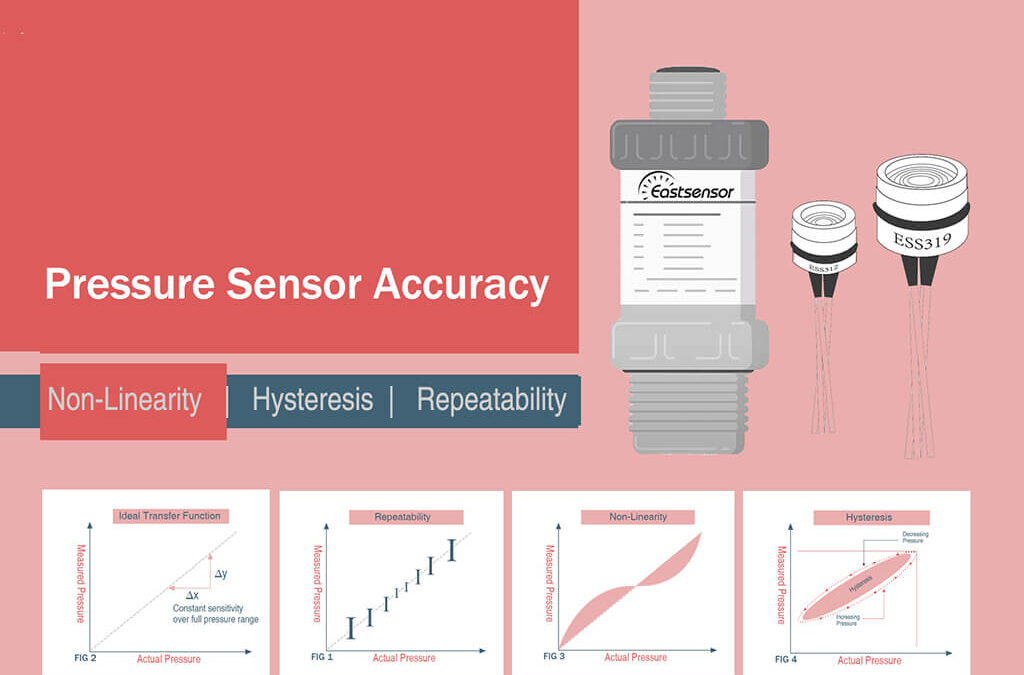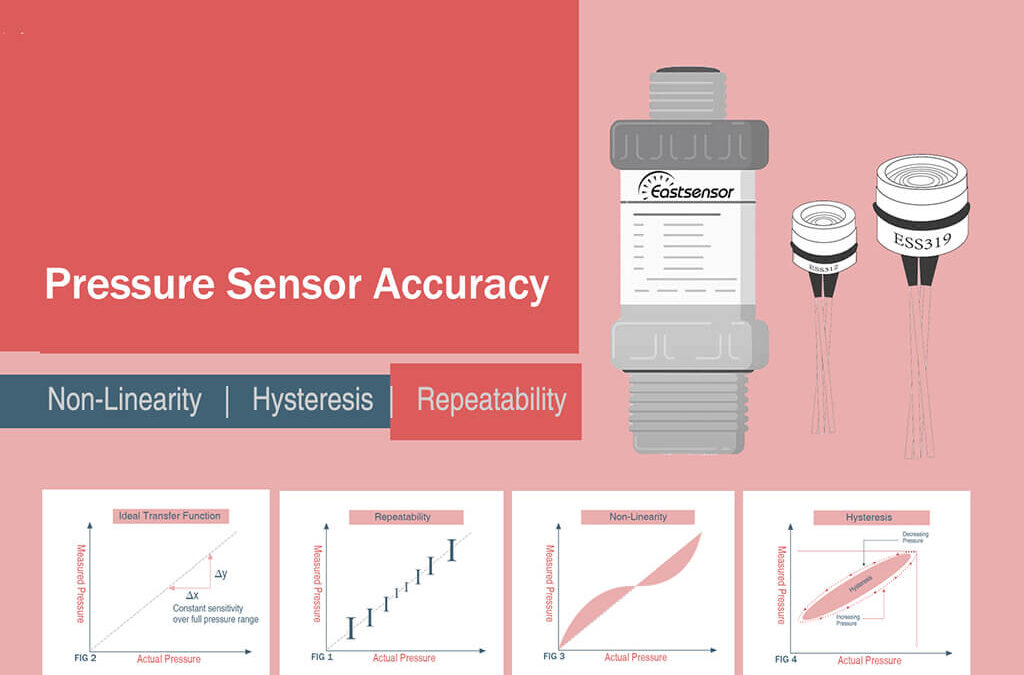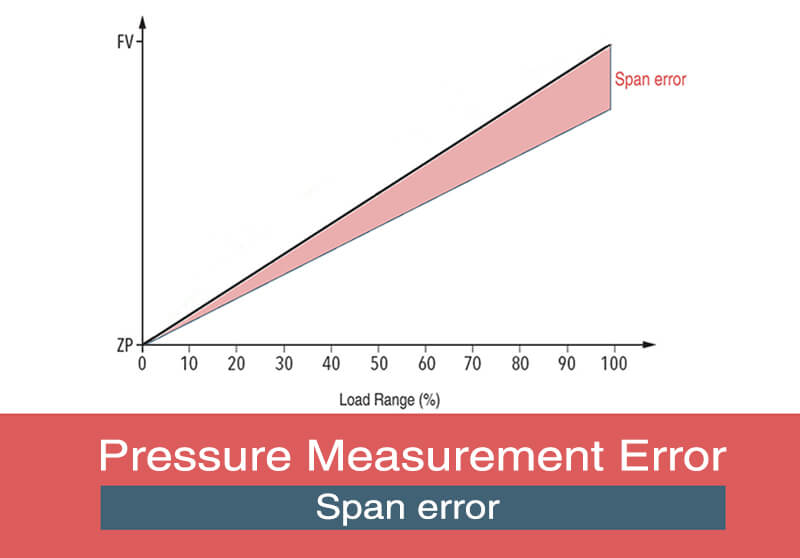
Span Error of Pressure Sensor

Span Error of Pressure Sensor

What is Span Error

Span error is one of the main types of errors seen in pressure sensor measurements. It refers to the deviation of the sensor’s output span from the ideal specified value. And it is usually expressed as a percentage of the ideal span value. The lower the span error, the more accurate the sensor.

Let’s say we have an ideal pressure sensor that is specified to output 1 to 5 volts as the input pressure changes from 0 to 100 PSI. The sensor’s ideal output span should be 5-1 = 4 volts.

However, in reality, due to various factors like component tolerances, non-linearity, hysteresis etc. the sensor’s actual output span may differ from the ideal 4 volt span. This difference is known as the span error.
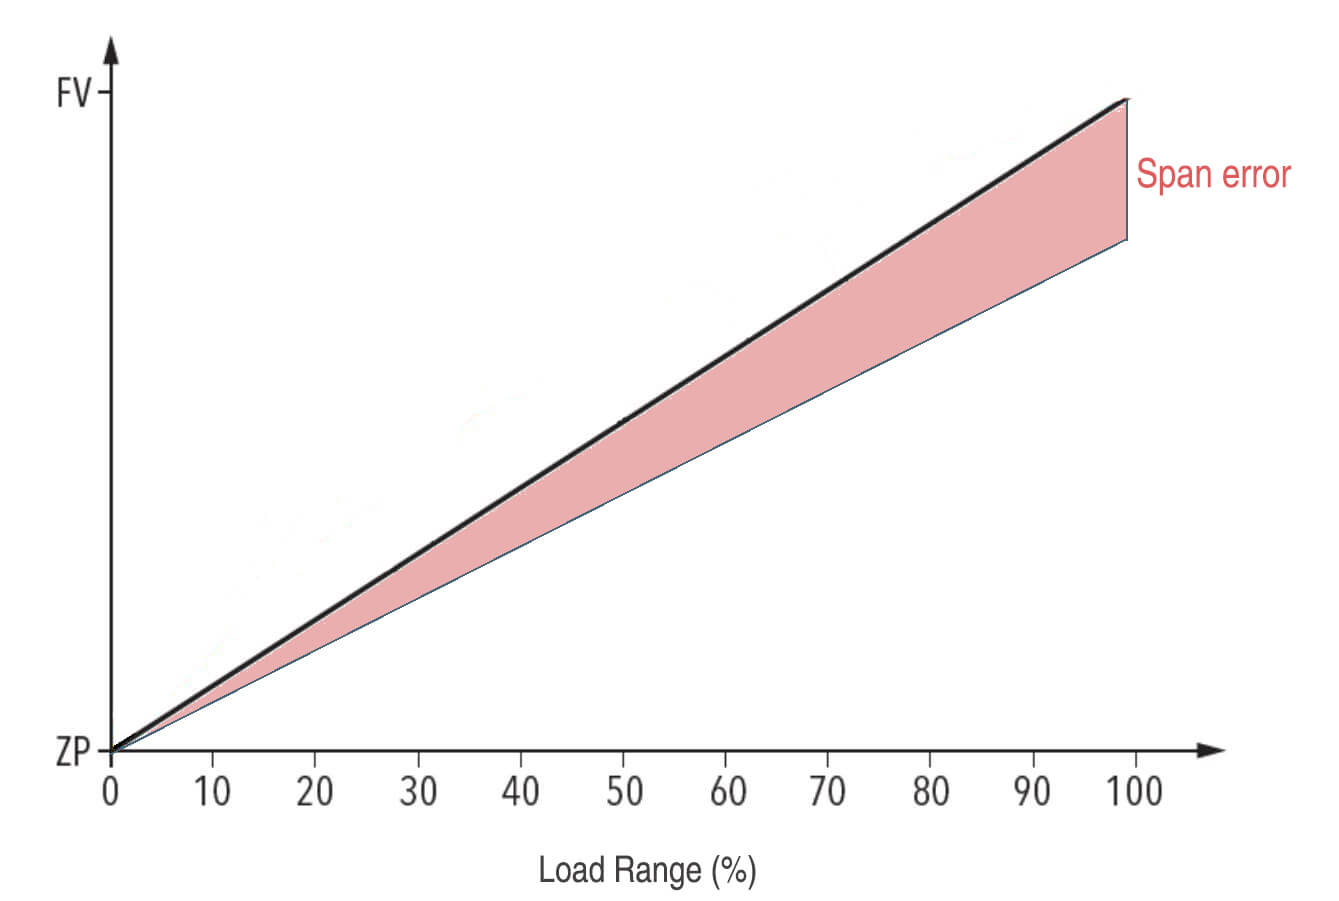
Pressure Sensor Span error

For example, if the sensor’s actual output changes from 0.8 volt at 0 PSI to 4.8 volt at 100 PSI, then the actual span is 4.8-0.8 = 4 volt. Since the ideal span is 4 volt, the span error in this case is 0%.

However, if the sensor’s actual output changes from 1 volt to 5.1 volt, then the actual span is 5.1-1 = 4.1 volt. In this case, the span error will be (4.1- 4)/4 = 2.5% positive span error.

How the span error affects the pressure sensor accuracy

Imagine a pressure sensor is specified to output 1-5 volts as the pressure changes from 0-100 PSI. This is the ideal span of 4 volts.

But the sensor’s actual span may be 4.1 volts due to factors like component tolerances, non-linearity, etc. This means a positive span error of 2.5% compared to the ideal span.

Now let’s see how this affects the sensor’s accuracy:

1) It causes a systematic offset

Since the actual span is 4.1 volts instead of 4 volts, all the sensor’s measurements will be systematically higher than the actual pressure. So at 0 PSI, instead of outputting 1 volt, it may output 1.025 volts. And at 100 PSI, instead of 5 volts, it may output 5.1 volts. This offset remains constant.

2) The error increases with pressure –

Since span error is specified as a percentage, the absolute error will increase linearly with pressure. So at higher pressures like 100 PSI, the error due to span will be larger.

3) Specified accuracy is invalid –

The sensor may be specified as ±1% accurate. But the actual accuracy will be worse due to the span error of 2.5%.

4) Precision is reduced –

Precision is the sensor’s ability to give the same reading for the same pressure. Even precision can degrade due to non-linear span error.

So positive span error will cause the sensor to give higher than actual readings with errors that increase linearly with pressure. This degrades both the sensor’s accuracy and precision compared to specifications.

What is the difference between span error and zero error

Span error represents the percentage deviation of the sensor’s actual output span from the ideal specified span. It captures non-idealities over the full sensor range.

Zero error captures the non-ideality only at the sensor’s zero pressure point. It indicates how much the zero output deviates from the specified value.

Both errors affect the sensor’s overall accuracy, with zero error mainly affecting measurements near zero pressure, and span error affecting measurements across the full pressure range.

Pressure Sensor None-Linearity+span erro+zero point error

How do manufacturers make sure span error as low as possible

Span error refers to the deviation of a pressure sensor’s actual output span from its specified ideal span, span error affects measurement across the full pressure range. In order to improve the measurement accuracy, there are a few ways to minimize span error in pressure sensor design and fabrication:

1. Use high-precision components

Many factors can cause span error, but one major factor is tolerances and mismatches in the sensor’s electronic components like resistors, capacitors, transistors, etc.

The tolerances specify how much the actual component value can differ from the rated value. Wider tolerances mean higher uncertainties in the component values.

For example, two 1k ohm resistors with 5% tolerance are used in a Wheatstone bridge pressure sensor circuit. This means the actual resistance of the resistors can be anywhere between 950 ohm to 1050 ohm.

Even if the nominal resistance is the same, due to the 5% tolerance, there is a chance the two resistors will have slightly different values. This mismatch can cause the bridge to become unbalanced, introducing span error.

However, if we use 1k ohm resistors with 0.1% tolerance instead, the actual resistances will be between 995 ohm to 1005 ohm. There is much less chance of a mismatch between the two resistors.

This will reduce the component-induced span error in the sensor. The smaller the tolerance, the lower the span error caused by component mismatches.

2. Reduce non-linearity

For various reasons, most sensors exhibit some degree of non-linearity. The output may not change at a perfectly constant rate across the full input range. This can distort the sensor’s actual output span.
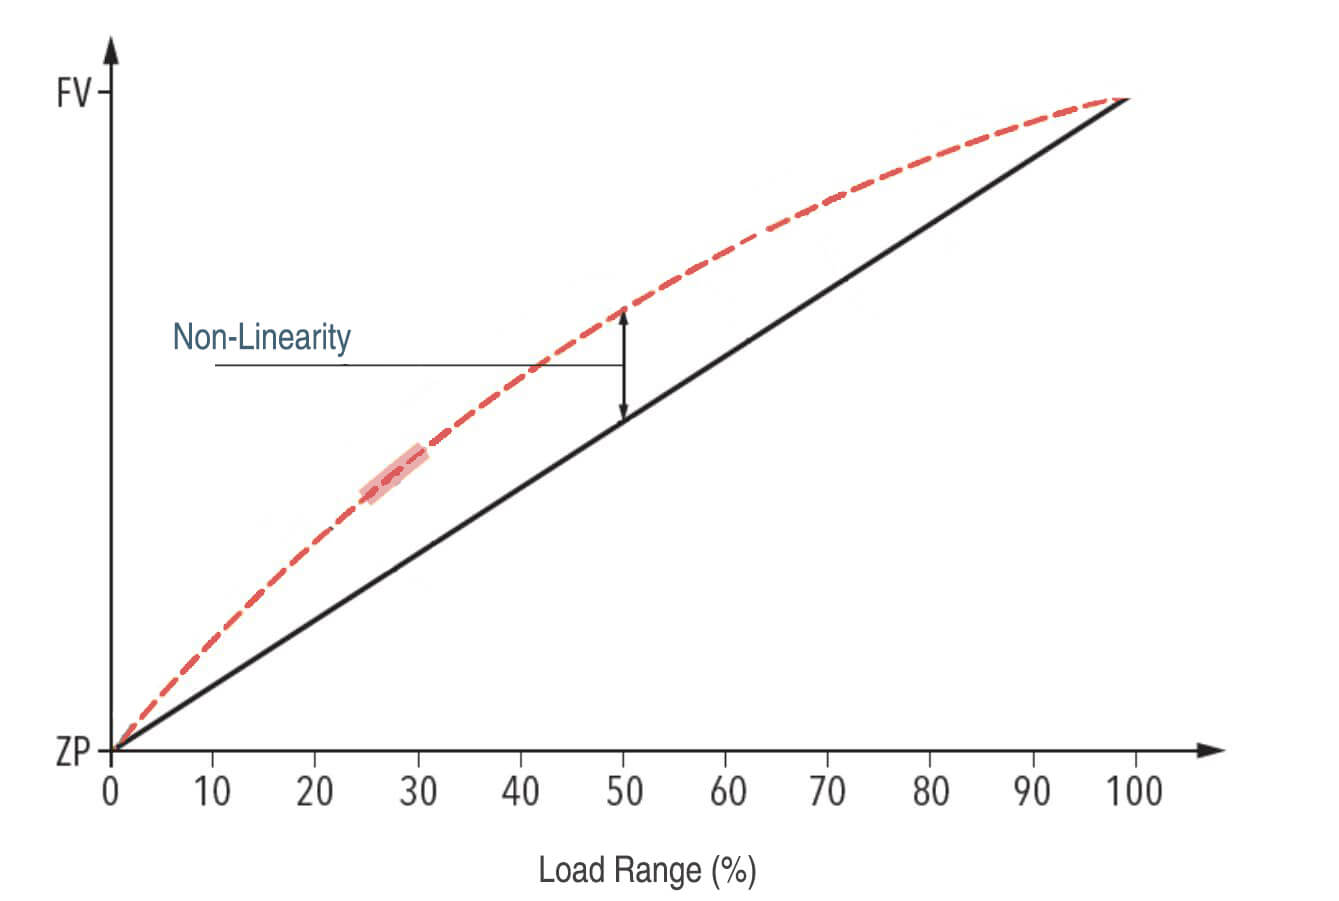
Pressure Sensor None-Linearity

For example, a pressure sensor is specified to output 1-5 volts as the input pressure changes from 0-100 PSI. The ideal span is 5-1 = 4 volts.

But due to non-linearity, the sensor’s output may change very slowly at lower pressures, then increase more quickly at higher pressures. This can cause the actual output span to be greater than 4 volts, introducing positive span error.

We need to minimize the sensor’s non-linearity to reduce this span error. There are a few ways to do this:

Use a sensing element with high inherent linearity, like a piezoresistive silicon sensor.

Perform linearity corrections using algorithms or look-up tables to linearize the sensor output electronically.

Tune the sensor’s mechanical and electrical design to achieve high linearity. For example, optimize the proof mass, transducer design, etc.

Perform multi-point calibration to characterize and compensate for non-linearities in the sensor response.

The lower the sensor’s non-linearity, its actual output span will be closer to the ideal specified span. This reduces span error and improves the sensor’s accuracy.

3. Perform calibration

Even with high-precision components and designs to minimize non-linearity, some span error is unavoidable in real sensors due to physical limitations and variations.

This is where calibration comes in. We can characterize the sensor’s actual span error by performing a 2-point or multi-point calibration of the sensor using precision pressure sources and measurement equipment.

Then by applying appropriate corrections or adjustments, we can electronically compensate for the span error and make the sensor’s actual output match the specified ideal output.

For example, let’s say a pressure sensor has a positive span error of 2%. During calibration:

  • We apply 0 PSI and measure the sensor’s zero output, say 1 volt.
  • We apply 100 PSI and measure the sensor’s full scale output, say 5.2 volts instead of the ideal 5 volts.
  • We calculate the sensor’s actual span as 5.2-1 = 4.2 volts, resulting in a 2% positive span error.
  • We then apply an electronic correction to scale down the sensor’s full scale output by 2%, bringing it back to the ideal 5 volts.
  • Now the sensor’s actual output span matches the specified ideal span of 4 volts, eliminating the span error.

4. Perform temperature compensation

One factor that can cause span error is temperature changes. As temperature varies, it can shift the sensor’s zero pressure output and full-scale output. This shift in the two endpoints changes the sensor’s actual output span.

For example, let’s say a sensor is specified to output 1-5 volts as the pressure changes from 0-100 PSI. The ideal span is 5-1 = 4 volts.

But as temperature increases, the sensor’s zero pressure output may increase from 1 volt to 1.025 volts. And its full-scale output may increase from 5 volts to 5.1 volts.

This gives an actual span of 5.1-1.025 = 3.975 volts. Since the ideal span is 4 volts, a negative span error is around 0.6%.

To compensate for this temperature-induced span error, we can perform temperature compensation using either:

Active compensation circuits monitor the sensor’s temperature and electronically adjust the output to negate the temperature effects.

Passive compensation uses temperature-sensitive elements like thermistors that self-correct the span drift over temperature.

Multi-point temperature calibration to characterize the span variation with respect to temperature. The data is then used to scale the output accordingly electronically.

By performing effective temperature compensation, we can keep the sensor’s actual output span close to the ideal specified span over the full operating temperature range. This minimizes temperature-induced span error.

5. Reduce hysteresis

Hysteresis refers to the phenomenon where a pressure sensor gives different readings for the same pressure, depending on the direction from which that pressure is approached.

For example, when the pressure is increased from 0 to 100 PSI, the sensor may output 1 to 5 volts. But when the pressure is decreased from 100 to 0 PSI, the sensor may output 1 to 4.8 volts. This difference in the output span in the two directions is known as hysteresis.

The presence of hysteresis in a sensor can introduce span error. This is because the sensor’s specified ideal span does not consider hysteresis. It assumes the same output span will be obtained irrespective of the pressure direction.

The specified ideal span for the above example sensor is 5-1 = 4 volts. But the actual output span obtained when decreasing the pressure is 4.8-1 = 3.8 volts. This represents a negative span error of around 5%.
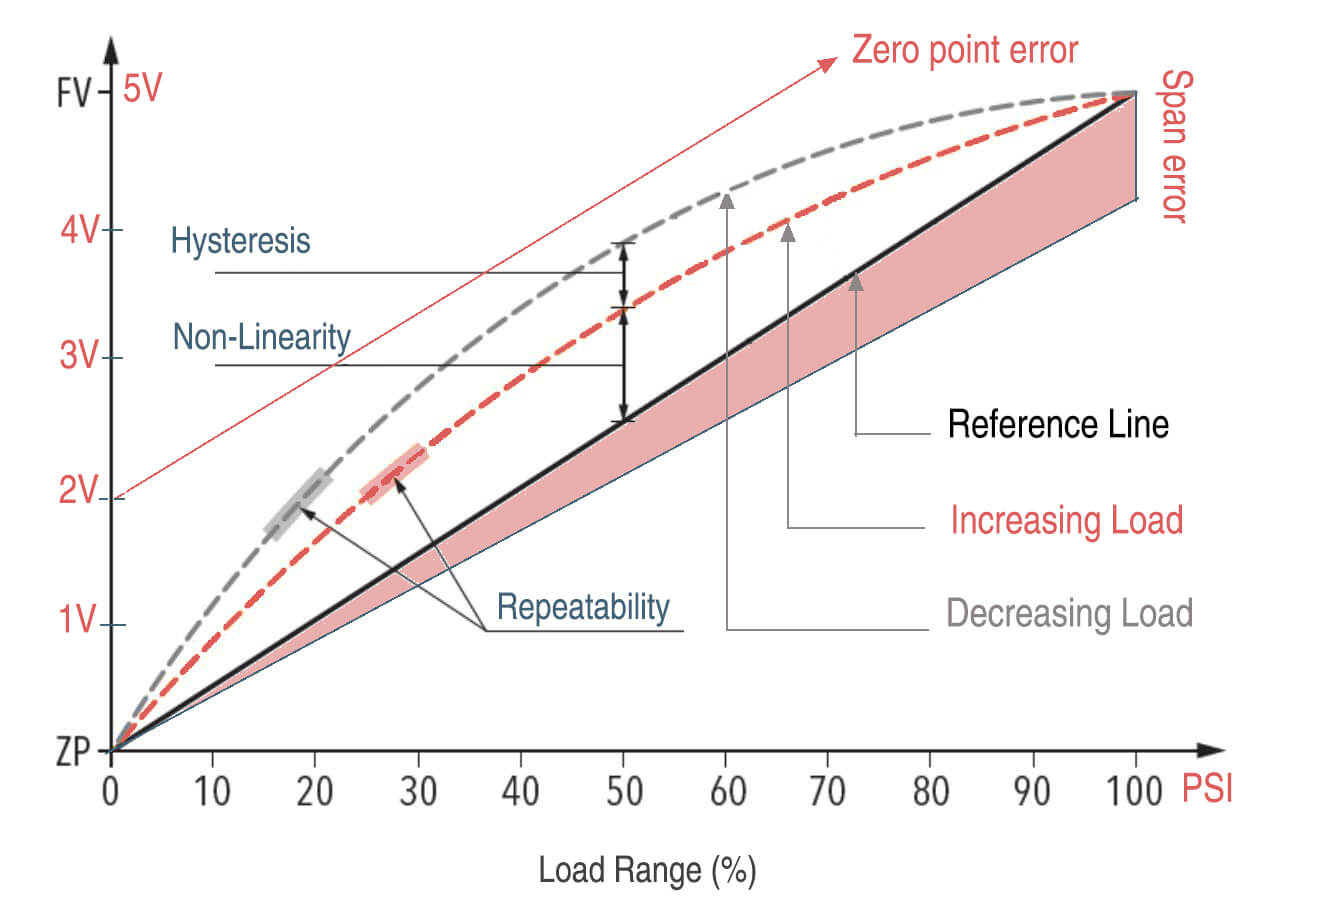
Pressure Sensor Span error and Zero point error

So hysteresis in a sensor reduces its actual output span compared to the specified ideal span, introducing span error.

We need to reduce the hysteresis in the sensor’s design and fabrication to minimize this effect. Ways to achieve this include:

  • Using low hysteresis sensing elements and transducer materials
  • Optimizing the proof mass and housing to minimize stiction and friction effects
  • Performing stress relief and conditioning procedures to break in the sensor
  • Applying lubricants or coatings to reduce hysteresis
  • Performing compensation using data from hysteresis characterization tests

The lower the hysteresis in the sensor, the closer its actual output span will be when the pressure is increased or decreased. This minimizes span error due to hysteresis.

6. Isolate the sensing element

By properly isolating the pressure sensor’s sensing element through appropriate housings, mounts, etc., we can minimize the influence of environmental factors that can introduce span error. This allows the sensor to provide an output span that more closely matches the ideal specified span, resulting in lower overall span error.

For example, let’s consider temperature effects:

Specifications:

  • Pressure range: 0-100 PSI
  • Ideal output span: 5-1 = 4 V

Without isolation:

  • At 25°C, output at 0 PSI = 1 V and at 100 PSI = 5 V
  • Actual span = 5-1 = 4 V, so 0% span error
  • At 100°C, output at 0 PSI = 1.1 V and at 100 PSI = 5.2 V
  • Actual span = 5.2-1.1 = 4.1 V, so positive span error of 2.5%

The temperature change caused the sensing element to shift its zero and full scale outputs, changing the actual output span and introducing span error.

With proper isolation:

  • The temperature change has less effect on the sensing element
  • Actual span stays around 4 V at both 25°C and 100°C
  • Lower span error over the temperature range

Pressure Sensor Non-Linearity

Pressure Sensor Non-Linearity

What is linearity for pressure sensor?

Linearity refers to how accurately a sensor’s output voltage or current corresponds to the actual applied pressure in a straight line or linear fashion.

A linear sensor’s output will change by equal amounts for equal pressure changes across its entire range.

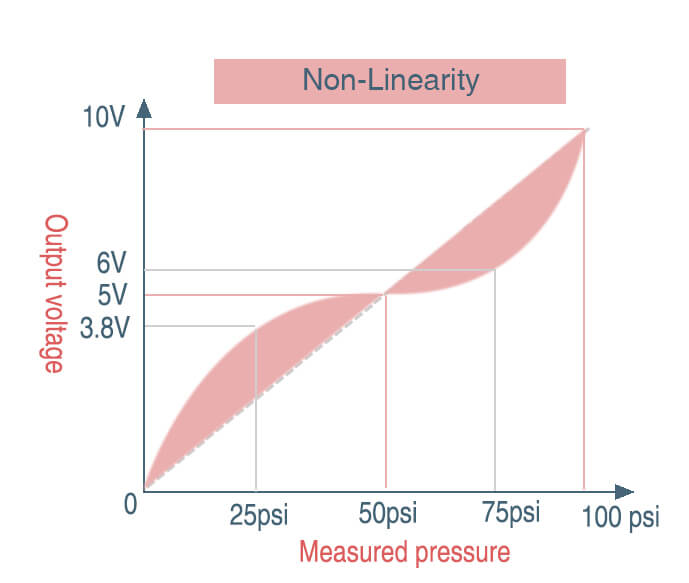
For example, a perfectly linear sensor with a 0-100 psi range would have:

  • An output of 0 V at 0 psi pressure
  • An output of 5 V at 50 psi pressure
  • An output of 10 V at 100 psi pressure

This is because its output changes by 1 V for every 10-psi change in pressure in a straight proportional relationship.

FIG 3.1 Non-Linearity Pressure Sensor-eastsensor

However, real pressure sensors are never perfectly linear. Non-linearity refers to the maximum deviation of a sensor’s actual output from this ideal straight-line response. It is typically specified as a percentage of full-scale output or pressure range.

For instance, a sensor might be rated for ±1% linearity. This means:

  • Across its entire 0-100 psi range, the sensor’s actual output will deviate by no more than ±1% from the ideal straight-line response.
  • At 50 psi, the output could be anywhere between 4.95V and 5.05V and still meet the ±1% specification.

The lower the non-linearity percentage, the more accurately the sensor’s output matches an ideal straight line proportional to pressure. This ensures accurate readings across the sensor’s full measuring range.

What is the difference between linearity and repeatability?

Linearity and repeatability are two important specifications for pressure sensors that describe different aspects of the sensor’s performance; however, they are different.

Linearity refers to how close the sensor’s output corresponds to the actual measured pressure in a straight-line fashion.

A linear sensor output means the sensor reading changes by the same amount for each equal increase in pressure.

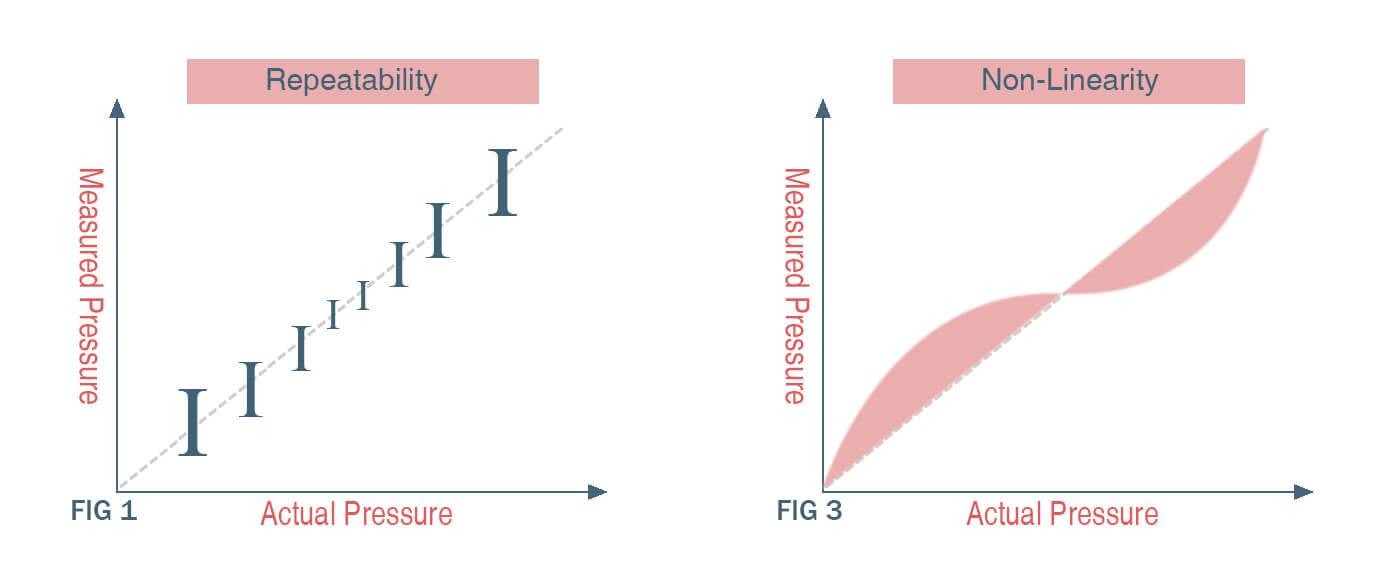
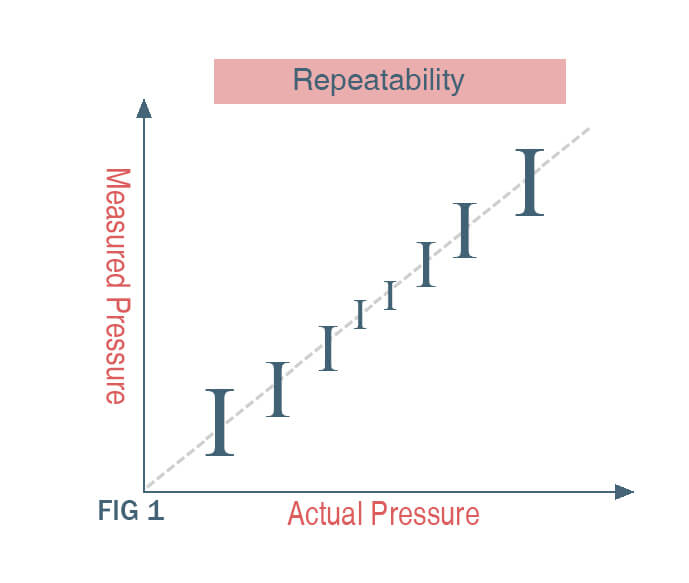
Repeatability refers to how consistent the sensor readings are when the same pressure is applied multiple times.

An ideal repeatable sensor would give the exact same reading every time for a particular pressure value.

Pressure Sensor Non-Linearity -eastsensor

For example, say a sensor is rated for a 0 to 10 bar pressure range. An ideal linear sensor would output 0 to 100% of its reading over that range, increasing by 10% for every 1 bar of pressure. However, real sensors will deviate from this linear behavior to some degree.

The linearity specification denotes the maximum deviation from this ideal straight-line response, usually stated as a percentage of full-scale output. The lower the linearity percentage, the more linear the sensor is.

When it comes to repeatability if a sensor is subjected to 5 bar pressure 10 separate times, a perfectly repeatable sensor would readout 5.000 bar each time. However, real sensors will show some variation in readings due to noise, hysteresis, etc.

The repeatability specification denotes the maximum deviation of readings at a given pressure over multiple cycles, usually stated as a percentage of full-scale output. The lower the repeatability percentage, the more repeatable the sensor.

How non-linearity affects the accuracy of pressure sensor reading?

Pressure sensors are designed to have an output that changes linearly with the applied pressure.

However, real sensors have some level of non-linearity in their response. This means the sensor output does not increase by exactly the same amount for each equal pressure change but deviates from the ideal linear response.

The sensor may read higher or lower than the actual pressure at any given pressure value due to its non-linear response. The amount of deviation depends on the sensor’s non-linearity specification.

For example, if a sensor has 2% non-linearity and needs to read 10 bar pressure, it may actually read between 9.8 bar to 10.2 bar. The higher the non-linearity, the wider this deviation and the lower the accuracy.

The error due to non-linearity also changes with pressure. The sensor may read values accurately at some pressures but deviate more at others, depending on its non-linear response curve.

Non-linearity causes the sensor’s readings to deviate from the actual pressures in non-uniform and unpredictable ways. This results in lower accuracy and increased error in the sensor measurements. The lower the sensor’s non-linearity specification, the smaller these effects and the higher its measurement accuracy.

How do manufacturers ensure that pressure sensors have good linearity?

The precise initial sensor design optimized for linearity, along with strict production controls and multi-point calibration across the measuring range are the most critical factors that help manufacturers ensure good linearity in their pressure sensors.

Let talk step by step:

  1. Precision sensor design – This is the most important factor. The type of sensing element, materials, sealing technologies and electronics are designed to maximize linearity from the beginning. Piezoresistive and strain gauge sensors tend to have better inherent linearity compared to capacitive sensors.

The material used for the flexible sensing diaphragm can affect how linearly it deflects under pressure. Materials like silicon, ceramic and metal foil are chosen for their good linear deflection properties.

  1. Strict production controls – Tight manufacturing tolerances and process controls are put in place to minimize variation that can cause non-linearity.

Very tight manufacturing tolerances are maintained for all sensor components and during assembly. This includes precisely controlling dimensions like diaphragm thickness, seal flatness, and location of sensing elements. Maintaining tolerances within ±1% or less can significantly improve linearity.

  1. Advanced calibration techniques – Many high-end sensors undergo multi-point calibration, measuring and adjusting at 3, 5 or more pressure points across the range. This allows any non-linearities to be electronically compensated for, resulting in a near-perfect straight-line response.

As an example, In Eastsensor, you can find below the linearity specifications for some common pressure sensor types we have

  • – Basic piezoresistive sensor: 0.5%- 1% of full scale
  • – Precision piezoresistive sensor: 0.25% of full scale
  • – Basic MEMS sensor: 2-3% of full scale
  • – Precision MEMS sensor: 0.5% of full scale

The tighter the manufacturing controls and calibration techniques used, the better the linearity that can be achieved – often down to 0.1% for the highest-performance sensors.

The common cause of on-linearity of pressure sensors

1, Diaphragm non-uniformity  

Any non-uniformity in the thickness or material properties of the flexible sensing diaphragm can cause it to deflect in a non-linear manner under pressure. This is a major source of non-linear output response.

In a pressure sensor, the flexible diaphragm deflects when pressure is applied. This deflection is detected by the sensor’s sensing elements to produce an electrical output.

For the sensor output to change linearly with pressure – meaning equal pressure changes produce equal output changes – the diaphragm must deflect in a linear fashion.

However, non-uniformity in the diaphragm can cause it to deflect in a non-linear manner, resulting in a non-linear sensor output response.

There are a few ways the diaphragm can be non-uniform:

  • Thickness variations – If the diaphragm has areas that are thicker or thinner, they will deflect differently under the same pressure. This causes the overall deflection to become non-linear.
  • Material properties – Variations in the diaphragm material’s stiffness, modulus, fatigue resistance etc. across its surface lead to non-linear deflection.
  • Residual stress – Uneven residual stresses locked inside the diaphragm material during manufacturing also change how different areas deflect.
  • Defects – The presence of defects like pits, scratches or inclusions make some areas of the diaphragm deflect non-uniformly.

2, Component misalignment

Pressure sensors have several components on the flexible sensing diaphragm that are precisely positioned to detect the diaphragm’s deflection under pressure. These include:

  • Sensing elements – Piezo resistors, capacitive plates or strain gauges that change electrical properties in response to diaphragm motion.
  • Electrical connections – Wires or traces that connect the sensing elements to other sensor components.

The intended locations and orientations of these components are critical for the sensor to detect changes in pressure in a linear fashion. Even minor misalignments during sensor assembly can introduce errors and non-linearities.

For example, if piezo resistors intended to be located at the center of the diaphragm are instead placed slightly off-center:

  • They will experience different amounts of strain for the same pressure change, leading to inconsistent resistance changes.
  • Their distance from the diaphragm’s fulcrum will change, altering their sensitivity to deflection.
  • They may detect deflection non-uniformities caused by other factors like diaphragm thickness variations.

3, Hysteresis

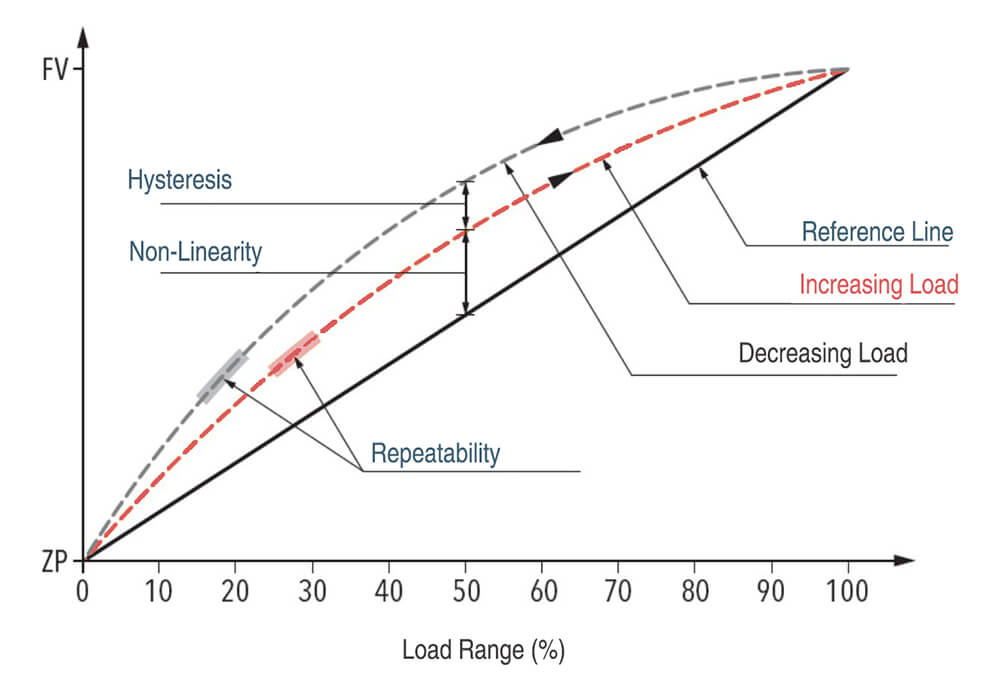
Hysteresis refers to the phenomenon where a sensor’s output does not retrace the same path when the input pressure changes direction. For example, when increasing then decreasing the pressure:

  • The sensor’s output may be slightly higher on the decreasing pressure curve compared to the initial increasing curve at the same pressure value.
  • The degree of hysteresis can also change at different pressure ranges.

This behavior causes the sensor response to become “bowed” or “curved” rather than a straight line, resulting in non-linear output.

As a result, hysteresis limits the sensor’s accuracy and linearity performance. The amount of hysteresis determines the degree of non-linearity in the sensor’s output.

Take an example to clarify linearity.

Let’s consider a pressure sensor that is rated for 0 to 10 bar with an output of 0 to 5 V. An ideal linear sensor would output:

  • 0 V at 0 bar pressure
  • 5 V at 10 bar pressure
  • Increase by 0.5 V for every 1 bar pressure rise

This means the sensor’s output changes by equal amounts for equal changes in pressure – the definition of linearity.

However, a real sensor may show some non-linearity in its response. For example:

  • At 0 bar pressure, the sensor reads 0 V accurately.
  • But at 3 bar pressure, it outputs 4.2 V instead of 3.75 V.
  • At 6 bar pressure, it reads 4.7 V instead of 4.5 V.
  • And at 10 bar pressure, it outputs 4.9 V instead of the ideal 5 V.

This shows the sensor has non-linearity in its response, deviating from the ideal straight line. The non-linearity increases with pressure.

To specify this non-linearity, the sensor datasheet would likely state:

Linearity: ≤2% of full scale

This means the maximum deviation of the sensor’s output from the ideal linear response is within ±2% of its 5V rating or ±0.1V.


Pressure Sensor Repeatability

Pressure Sensor Repeatability

Repeatability refers to a sensor’s ability to provide consistent measurements under the same conditions over time.

A pressure sensor with good repeatability will provide similar readings each time the same pressure is applied, with minimal variation. Repeatability has a significant impact on all aspects of a pressure sensor’s performance.

What is repeatability for pressure sensor?

Pressure sensor repeatability refers to the sensor’s ability to provide consistent measurements under the same conditions over time.

A sensor with good repeatability will give you similar readings each time you apply the same pressure, with minimal variation between measurements.

Repeatability is important for measurements that need to be consistent over time. If a sensor has poor repeatability, the readings will vary unpredictably even under unchanged conditions. This makes it difficult to detect actual changes in pressure.

Normally, repeatability has been typically listed as a percentage of full scale or parts per million (ppm) in the sensor’s datasheet.

Lower numbers mean better repeatability.

  • Values below 1% are considered good
  • Value below 0.5% is excellent repeatability

FIG 1 Repeatability Pressure Sensor-eastsensor

What is difference between repeatability and hysteresis?

Repeatability and hysteresis are two related but distinct concepts for pressure sensors:

Repeatability refers to how consistent a sensor’s readings are when the same pressure is applied multiple times. It indicates the sensor’s stability and ability to provide the same measurement under unchanged conditions.

Hysteresis is the difference in a sensor’s readings when the pressure is increased versus when it is decreased. It measures the lag or memory effect in the sensor’s response.

Let’s put it in sample:

  • Repeatability indicates a sensor’s stability for consistent measurements.
  • Hysteresis reveals deviations in a sensor’s response characteristics.
  • Poor repeatability leads to unpredictable drift and variations in readings over time that limit consistency.
  • High hysteresis means the sensor will give different readings depending on the pressure history, reducing accuracy and creating measurement errors.

Pressure Sensor Hysteresis Linearity Repeatability

How repeatability affects pressure sensor performance?

Repeatability is a key performance factor in pressure sensors, as it impacts the accuracy and reliability of measurements. We’ve listed many aspects below to show how it affects pressure sensor performance:

  1. Accuracy: Repeatability is closely related to the accuracy of a pressure sensor, but it is not the only factor that makes up accuracy. On top of repeatability, hysteresis, and non-linearity also contribute to different error performances and finally consist of the meaning of pressure sensor accuracy.

Repeatability refers to the ability of the sensor to provide the same output under the same conditions over multiple cycles. A sensor with high repeatability will consistently provide the same reading every time the same pressure is applied. If the sensor’s repeatability is poor, the readings vary each time, leading to inaccurate measurements.

  1. Reliability: The reliability of a pressure sensor is also heavily dependent on its repeatability. A sensor that has high repeatability will deliver reliable pressure readings over a long period of time. In contrast, a sensor with low repeatability may provide inconsistent readings, which could lead to unreliable data and potential failure in the application it’s used in.

So when we talk about the most reliable pressure sensor, it definitely should have the performance of high repeatability.

  1. Calibration: High repeatability also simplifies the calibration process.

If the sensor’s output is consistent under the same conditions, it’s easier to map the sensor’s output to the actual pressure values. On the other hand, if the sensor’s repeatability is poor, the calibration process becomes more complex and may need to be performed more frequently.

  1. Lifecycle Costs: A pressure sensor with high repeatability can lead to lower lifecycle costs. These sensors are less likely to require replacement or frequent recalibration due to inconsistent performance, thus reducing the overall maintenance costs.

How do manufacturers ensure that pressure sensors have good repeatability?

When selecting a pressure sensor for a specific application, it’s important to consider the sensor’s repeatability alongside other specifications like range, accuracy, and hysteresis. The higher repeatability, the more reliability and stability you may get, so repeatability became one of the most important technical data when fabricating pressure sensors.

The manufacturer can employ several techniques to ensure their pressure sensors have good repeatability; in practice, Eastsensor always takes the below 3 techniques into consideration when designing and producing a pressure sensor.

  1. Tight manufacturing tolerances

Producing sensors with very small variations in dimensions, material properties, and electrical values is critical for repeatability. In Eastsensor we will:

  • Strictly control the thickness of diaphragms and sensing elements
  • Narrowly specify allowable resistance ranges for strain gauges
  • Maintain tight limits on the dimensions of housings and ports

So finally, the smaller the manufacturing tolerances, the more consistent the sensor performance will be.

  1. Material selection

By optimizing the sensor’s materials, its repeatability can be greatly improved.

So we always choose materials that are stable, consistent, and resist degrading over time is important.

  • Evaluate materials for hysteresis, creep, and other effects that cause drift
  • Select casing metals that won’t corrode or react with pressure media
  • Use sensing elements with low temperature coefficients for stability
  1. Temperature compensation

Compensating for the sensor’s inherent sensitivity to temperature changes allows it to maintain consistent performance over a range of temps. Manufacturers will:

  • Add temperature sensors near sensing element, for example: ESS319T
  • Develop compensation algorithms based on sensor’s performance at different temps
  • Integrate compensation circuitry to offset any temp-induced variance

Are there any sensors that have both high hysteresis and poor repeatability?

In practice, some pressure sensors can really have both high hysteresis and poor repeatability, it’s sad, especially for lower cost or lower grade sensors.

Some basic piezoresistive pressure sensors are among the simplest and cheapest pressure sensors, when they tend to have high hysteresis levels of 1-2% due to mechanical deformation, as well as poor repeatability of only 1-3%, such piezoresistive pressure sensor will cause obvious error and lead to poor performance.

On the other hand, sensors without compensation for factors like temperature have unstable performance, contributing to hysteresis and repeatability problems.

Sensors with issues like improper sealing, aging, material mismatches or excess mechanical stress can experience both hysteretic losses and lack of stability over time.

However, high-performance pressure sensors typically have both very low hysteresis (below 0.1%) and excellent repeatability (0.05%-0.1%). This includes many ceramic sensors, like ESS501I/V ceramic piezoresistive pressure sensor module, fully compensated sensors and those designed for precision applications.

How can I determine the appropriate repeatability requirement for my specific application?

There are a few factors to consider when determining the appropriate repeatability requirement for your pressure sensor application.

Here are the top 3 steps to determine the appropriate repeatability requirement for your pressure sensor application, below we explained in an accessible manner:

  1. Determine your system’s sensitivity to pressure variations

How much will small changes in the pressure readings affect your process or measurements? Applications that detect minor pressure fluctuations require higher repeatability, while less sensitive systems can tolerate lower repeatability.

For example:

  • Monitoring for leaks – requires <0.1% repeatability
  • Basic process control – 1-2% repeatability may suffice
  • Threshold detection – needs repeatability better than your threshold tolerance
  1. Consider the precision and accuracy needs of your overall system

The repeatability of the pressure sensor should be at least 2-3 times better than the overall accuracy you require to ensure variations stay within acceptable error limits. More precise applications with tighter tolerances will demand higher repeatability sensors.

For example:

  • 1% system accuracy → select sensor with <0.33% repeatability
  • 1% system accuracy → sensor repeatability <0.05%
  • Ensure the precision of your other components matches the sensor’s repeatability.
  1. Perform test measurements on your actual system

By monitoring variations in readings under constant pressure, you can determine an appropriate repeatability level for your specific application.

Steps include:

  • Apply a stable pressure source
  • Record sensor readings at regular intervals
  • Calculate the standard deviation as a % of the full-scale range

This provides an empirical repeatability level for your system.

Take an example to clarify repeatability

A manufacturer produces a pressure sensor with a range of 0 to 100 psi. They specify the repeatability of this sensor as ±0.25% full scale. This means:

  • The full scale range is 0 – 100 psi
  • 25% of this 100 psi range is 0.25 psi
  • Therefore, the specified repeatability is ±0.25 psi

What this means in practice is:

  • If you apply a constant 50 psi pressure to the sensor multiple times, its readings should vary by no more than ±0.25 psi from one reading to the next.
  • So the readings at 50 psi should fall between 49.75 psi and 50.25 psi to meet the specified repeatability.
  • Any readings outside that 0.5 psi range (49.75 to 50.25 psi) indicate the sensor is not performing within its repeatability specification.
  • 1% repeatability would correspond to ±0.1 psi variation at 100 psi, or a range of 99.9 to 100.1 psi.

The smaller the repeatability percentage, the tighter the range of acceptable readings at a given pressure. The lower the variation between readings at constant pressure, the better the repeatability.

So by specifying repeatability as a percentage of full scale, manufacturers can define an acceptable tolerance for measurement consistency across the sensor’s entire measuring range.

Pressure Sensor Hysteresis – Pressure Hysteresis

Pressure Sensor Hysteresis – Pressure Hysteresis

What is Hysteresis for Pressure Sensor?

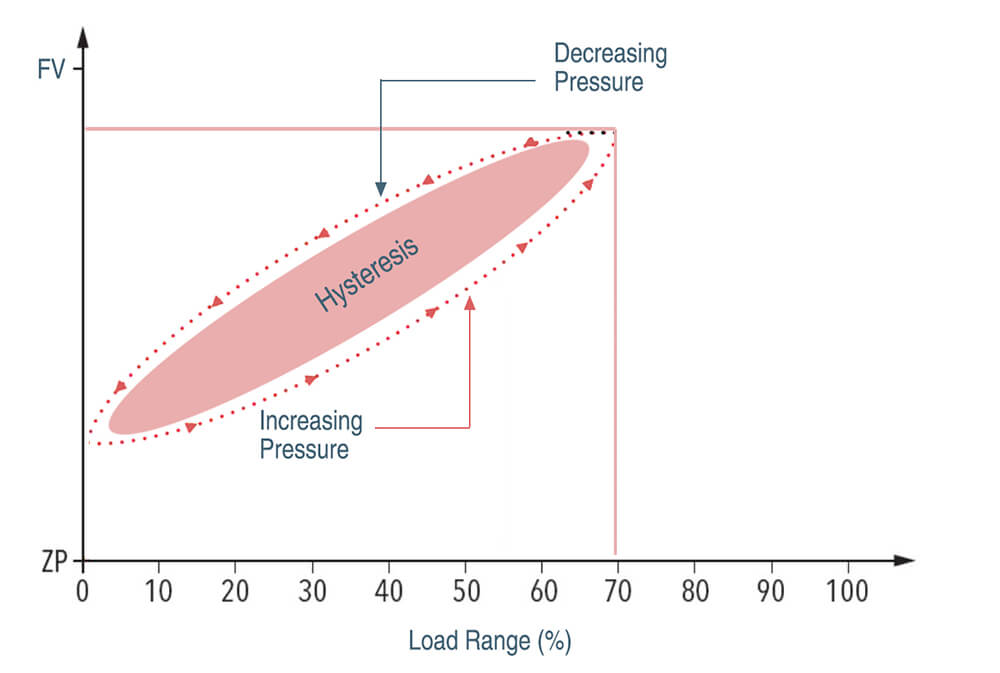
Hysteresis is a measure of accuracy for pressure sensors and refers to the difference in output readings at a specific pressure over multiple cycles of increasing and decreasing pressure. Here is an overview in simple terms:

When you apply pressure to a sensor and then release that pressure, the sensor’s output should in theory return you to the same value it started at before that specific pressure cycle. However, in reality there are often small differences between the initial value and the final value after a pressure cycle.

This difference is known as hysteresis and results from various physical phenomena within the sensor.

Ideal sensors would have zero hysteresis. But in practice, hysteresis is always some non-zero value and sensor specifications will state what the maximum hysteresis is at various pressures within the sensor’s measurement range.

Pressure Sensor Hysteresis-eastsensor

Hysteresis is often expressed as a percentage of full-scale output or in units of pressure (psi, bar, Pa, etc.). For example, a pressure sensor may have:

  • Hysteresis ≤1% full scale – Meaning the maximum difference between initial and final readings after a pressure cycle will be 1% or less of the sensor’s full scale measurement range.
  • Hysteresis ≤10 psi – Meaning the maximum difference between readings is 10 psi or less, regardless of the sensor’s full scale range.

Hysteresis error is hard to distinguish from other errors, and it cannot be predicted for a specific moment because it depends on whether the pressure was increased or decreased before the measurement was taken.

What is the difference between hysteresis and sensitivity?

Hysteresis and sensitivity are two different but related characteristics of pressure sensors:

  1. Hysteresis refers to the difference in readings at a specific pressure over multiple pressure cycles, as we discussed previously. It indicates accuracy and precision of the sensor and it is expressed as a percentage of full scale output (such as 0.5%/FS) or in units of pressure (psi, bar, Pa, etc.).
  1. Sensitivity refers to the change in sensor output (voltage, current, frequency) relative to a change in the measured pressure. Sensitivity is expressed in units like mV/psi, mA/bar, Hz/kPa, etc., such as 3mv/psi.

So let’s put it in simple terms:

  • Hysteresis describes the accuracy and reproducibility of readings
  • Hysteresis indicates the ability of the sensor to reproduce the same readings at a given pressure, showing accuracy and consistency, expressed as 0.2%/FS
  • Sensitivity describes the resolution and measurement range
  • Sensitivity indicates the resolution and range of the sensor, showing how finely it can distinguish between different pressure levels, expressed as 2mv/psi
  • Inverse relationship

There is an inverse relationship between hysteresis and sensitivity – as one increases, the other often decreases.

Pressure Sensor Hysteresis Linearity Repeatability

Higher sensitivity generally means a sensor can detect smaller pressure changes, so hysteresis as a percentage of full scale will tend to be lower.

However, higher sensitivity can also make a sensor more susceptible to external factors that contribute to hysteresis, like material stress and deflection.

Finally, manufacturers must optimize sensor design to maximize sensitivity while also minimizing hysteresis. This balancing act is a key performance tradeoff.

How hysteresis affects pressure sensor performance?

Based on previous discussion, you may understand the difference between hysteresis and sensitivity, in the following we continue to discuss how hysteresis affect pressure sensor performance.

Hysteresis can affect pressure sensor performance in a few key ways, and hysteresis contributes various types of error and non-ideal effects that degrade key sensor performance metrics like accuracy, repeatability, stability, precision, and resolution. The magnitude of these performance impacts generally increases with larger hysteresis.

  1. Accuracy – As we’ve discussed, hysteresis represents a deviation from accurate pressure readings. The larger the hysteresis, the less accurate the sensor output will be.
  1. Repeatability – Sensors with high hysteresis will not give consistent readings at the same pressure, impacting the sensor’s repeatability and reproducibility.
  1. Stability – Over time, hysteresis can gradually increase due to material stress and component wear, degrading sensor stability, and longevity.
  1. Noise – Hysteresis effects can manifest as low-frequency noise or drift in the sensor output, lowering the signal-to-noise ratio.
  1. Precision – Hysteresis limits the lowest detectable pressure change that a sensor can resolve, impacting the overall measurement precision.
  1. Measurement error – The hysteresis value itself represents an error band within which the “true” pressure value lies. Larger hysteresis means larger measurement error.
  1. Calibration – Sensors with high hysteresis require more complex calibration schemes to compensate for hysteresis effects, adding cost and complexity.
  1. System performance – The sensor’s hysteresis will limit any pressure sensor measurement system. Applications with tight accuracy requirements are most affected.

This is why sensor specifications will often place strict limits on maximum allowable hysteresis tailored to the requirements of the intended application.

How do manufacturers ensure that pressure sensors have low hysteresis?

There are a few key ways that pressure sensor manufacturers minimize hysteresis:

  1. Sensor material selection – Certain materials are naturally more prone to hysteresis effects than others. Manufacturers select sensor materials like diaphragms, seals, and fill fluids that minimize hysteresis as much as possible.
  1. Optimized sensor design – Sensor design features like diaphragm shape, size, and thickness, as well as seal design can be optimized to reduce friction, stiction, and deformation that cause hysteresis.
  1. Aging and burn-in testing – New sensors often have higher initial hysteresis that decreases over time as materials settle and conform. Manufacturers perform aging and burn-in tests to identify sensors with high initial hysteresis and optimize the “break-in” process.
  1. Tight process controls – Manufacturers maintain very tight production tolerances and process controls to ensure consistency between sensors and minimize variability that could impact hysteresis.
  1. Compensation and calibration – Some manufacturers implement digital compensation algorithms or multi-point calibration to mathematically model and correct for residual hysteresis in the sensor output. This requires accurate hysteresis characterization.

Below is one of ESS501V pressure sensor module (0-50bar range) (after compensation) performed at different temperature environment

  1. Screening and binning – Manufacturers test every sensor produced to measure its actual hysteresis. Sensors are then “binned” into groups based on their hysteresis performance. Only sensors that meet the required hysteresis spec are sold for that application.
  1. Aging and lifetime testing – Manufacturers stress test sample sensors to accelerate aging and ensure hysteresis remains within specifications over the intended life and duty cycle of the sensor.

All of these manufacturing techniques and quality controls help minimize hysteresis and ensure the sensor performs as specified. The most critical factor is accurate characterization of hysteresis for each sensor so appropriate compensation, calibration, and binning decisions can be made.

Take an example to clarify hysteresis.

Let’s take a real industry case as example to illustrate hysteresis in a pressure sensor:

Imagine you have a pressure sensor with a full-scale range of 100 psi. You slowly increase the pressure from 0 to 50 psi, and the sensor output reads 2.500 volts.

Then you slowly decrease the pressure back down to 0 psi. Ideally, the sensor output should return to the original 0 V level that it started at.

However, due to hysteresis, let’s say the sensor output only returns to 0.050 V when the pressure reaches 0 psi again.

So in this example:

  1. The “true” pressure is 0 psi
  1. The initial sensor output at 0 psi was 0 V
  1. But after the pressure cycle up to 50 psi and back down, the sensor reads 0.050 V
  1. The difference between the initial 0 V reading and the final 0.050 V reading is 0.050 V
  1. This 0.050 V difference is the hysteresis at 0 psi for this sensor
  1. Expressed as a percentage of full scale, the hysteresis is:0.050 V / 2.500 V = 0.02% full scale
  1. Or expressed in units of pressure, assuming a 50 psi pressure change caused a 2.500 V output change, the hysteresis is: 0.050 V / 2.500 V * 50 psi = 1 psi
  1. Hysteresis is the difference in sensor readings at the same pressure before and after a pressure cycle
  1. It can be expressed as an absolute value (0.050 V in this case), as a percentage of full scale (0.02%), or in units of the measured variable (1 psi)
  1. The sensor’s specified maximum hysteresis would indicate which of these values (V, %, psi) it is referring to
  1. And the amount of hysteresis impacts the sensor’s accuracy, repeatability, and measurement error as we discussed previously